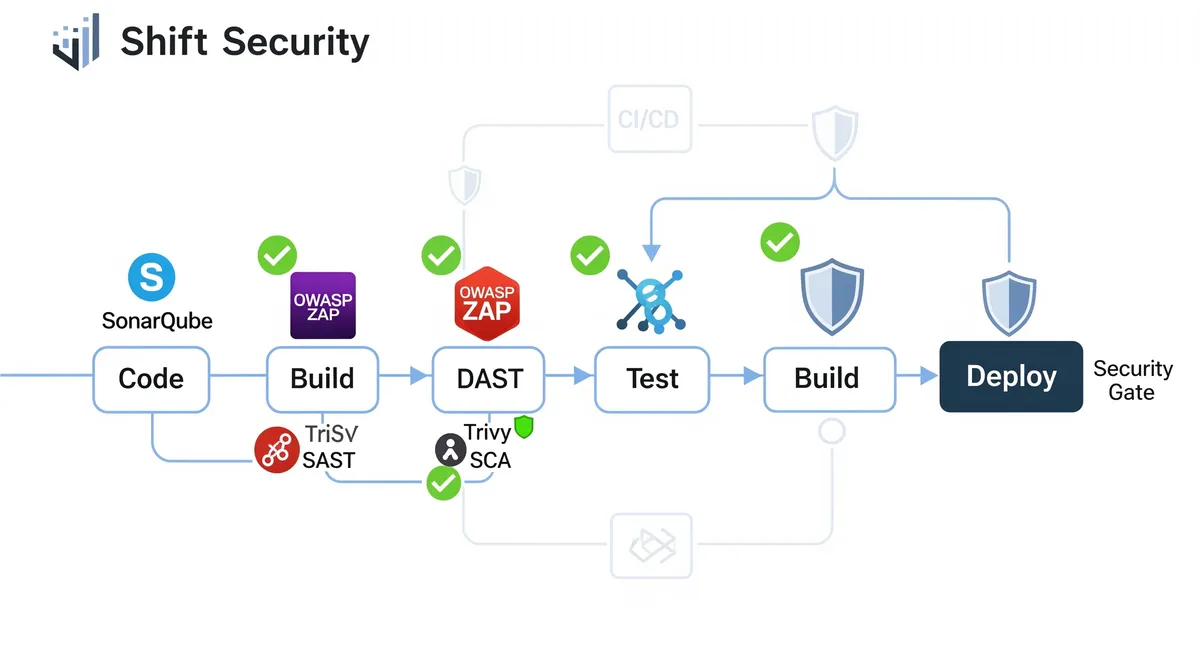
Let’s be honest: in today’s software world, security can’t be an afterthought. If you’re still waiting until the end of your development cycle to think about vulnerabilities, you’re doing it wrong. That’s where shift-left security comes in. Instead of treating security like a final checkpoint before release, we’re moving it way earlier in the process, right from the start. Think of it as catching problems before they become problems.
This approach fits perfectly with DevOps and DevSecOps practices. You’re already automating things and working cross-functionally, so why not bake security into that workflow? When you start thinking about security during the planning phase (yes, that early), you build stronger, more resilient applications. Developers catch issues when they’re still easy and cheap to fix. No more panic-mode security patches right before launch. Shift-left security means you’re proactive instead of reactive, and that saves you time, money, and a ton of headaches.
So why does this matter so much? Let’s break it down. First, it’s way cheaper to fix a security bug during development than in production. We’re talking orders of magnitude cheaper. Second, when security checks run alongside your normal development workflow, you actually ship faster because you’re not scrambling at the last minute. Third, applications built with security in mind from day one are just more secure, period. They’re harder to exploit and less likely to leak data.
But there’s more. Shift-left security gets your dev, security, and ops teams actually talking to each other. Everyone understands the security requirements from the beginning, and developers become more security-aware over time. This approach also makes compliance easier (who doesn’t want that?) and builds trust with your users. Bottom line: you catch risks early, reduce technical debt, ship faster, and spend less time fixing broken things.
SAST, DAST, SCA: Your Early Warning System
How Can SAST Help You Find Problems Early On?
Static Application Security Testing (SAST) is your first line of defense in shift-left security. Think of it as a spell-checker, but for security vulnerabilities. SAST tools analyze your source code without actually running it, looking for potential security issues. This is what we call “white box” testing because the tool can see everything inside your application.
Here’s how it works: the tool parses your code to understand its structure, then analyzes it to understand what it does and how different parts connect. It’s looking for patterns that match known vulnerabilities and bad coding practices. SAST tools also track data flow through your application to spot places where untrusted input could cause problems.
SAST catches a wide range of issues: SQL injection, Cross-Site Scripting (XSS), buffer overflows, hardcoded secrets, weak cryptography, poor error handling, dead code, code duplication, and resource leaks. The best part? It gives you immediate feedback. You get the exact file, location, and line number where the problem is, plus guidance on how to fix it.
You can integrate SAST directly into your IDE so developers see issues as they code, or run it in your CI/CD pipeline for automated checks. It’s scalable, repeatable, and can even analyze compiled code like binaries and bytecode. By catching vulnerabilities before they reach production, SAST makes your applications more secure and helps developers learn to write better code.
What’s DAST, and Why Is Testing Running Applications So Important?
Dynamic Application Security Testing (DAST) takes a different approach. Instead of analyzing static code, DAST tests your running application by simulating real attacks. This is “black box” testing because the tool doesn’t know anything about your application’s internals. It’s testing from an attacker’s perspective, which is exactly what you want.
DAST finds issues that only show up at runtime, things SAST can’t catch. It tests how your app handles requests and responses, how it interacts with other services, how it manages sessions and authentication. You get a real-world view of your security posture. DAST excels at finding input validation issues, server misconfigurations, and authentication bypasses. It can test your entire application flow, including complex multi-step processes and business logic vulnerabilities. It’s also perfect for testing third-party applications where you don’t have source code access.
DAST tools launch automated attacks (SQL injection, XSS, etc.) and watch how your app responds. They generate detailed reports with actionable findings and remediation guidance. You can integrate DAST into your CI/CD pipeline for continuous testing, run it against staging environments, or even use it on production (carefully). It helps you prioritize fixes based on actual risk and is essential for compliance requirements. Since it tests the running app, DAST catches runtime issues and client-side vulnerabilities that static analysis misses.
What’s SCA, and Why Should You Keep an Eye on Your Dependencies?
Software Composition Analysis (SCA) is your dependency watchdog. Modern applications use tons of open-source libraries and third-party components. SCA tools automatically discover all these dependencies by scanning package managers, manifest files, source code, binaries, and container images. They create a Software Bill of Materials (SBOM), basically an inventory of everything your app depends on. Then they cross-reference this against vulnerability databases like the National Vulnerability Database (NVD) to flag any known security issues.
Why does this matter? Because open-source components come with licensing requirements and security risks that are hard to track manually. SCA helps you manage these risks by identifying vulnerable dependencies, ensuring license compliance, and monitoring your software supply chain for malicious or compromised packages. It also flags outdated components and gives you visibility into your entire dependency tree. In the DevSecOps world, SCA is essential for shift-left security.
SCA tools identify vulnerabilities and recommend fixes or updates. Some can assess the health of open-source projects. They automate dependency scanning and can alert you or even block builds if they find policy violations. Many integrate directly into your IDE to warn developers as they add new packages. SCA scans aren’t limited to your code; they also check your cloud infrastructure and runtime environments. They help you manage SBOMs, track transitive dependencies (the dependencies of your dependencies), and meet compliance requirements.
Making Security a Part of Your Pipeline: Integrating SAST/DAST/SCA in CI/CD
How Can You Integrate SAST into Your CI/CD Workflow?
Integrating SAST into your CI/CD pipeline is crucial for catching vulnerable code before it reaches production. This automates security checks with every code change, giving developers immediate feedback so they can fix issues quickly.
Here’s how to make it work. Start by defining your security requirements clearly. Pick a SAST tool that supports your programming languages and tech stack. Popular options include SonarQube, Fortify, Checkmarx, and Semgrep. Connect it to your version control system (like Git) so scans trigger automatically on code changes. Configure the tool for your specific needs to reduce false positives and improve accuracy. Then integrate it into your CI/CD pipeline using Jenkins, GitLab CI, GitHub Actions, or Azure Pipelines.
Run an initial scan of your existing codebase to establish a baseline. Connect the findings to your issue tracking system (like Jira) so developers get notified immediately. Many teams configure their pipeline to fail builds if critical security issues are detected. Here’s a practical example using GitHub Actions with SonarQube:
name: SAST Security Scan
# Security: Restrict workflow triggers to prevent unauthorized runson: push: branches: [main, develop] pull_request: branches: [main] workflow_dispatch: # Allow manual triggers for security audits
# Security: Define minimum permissions (OIDC best practice)permissions: contents: read security-events: write pull-requests: write
jobs: validate-inputs: name: Validate Configuration runs-on: ubuntu-latest steps: # Security: Validate required secrets are present - name: Validate Required Secrets run: | set -euo pipefail # Exit on error, undefined vars, pipe failures
if [ -z "${{ secrets.SONAR_TOKEN }}" ]; then echo "::error::SONAR_TOKEN secret is not configured" exit 1 fi
if [ -z "${{ secrets.SONAR_HOST_URL }}" ]; then echo "::error::SONAR_HOST_URL secret is not configured" exit 1 fi
echo "✓ All required secrets are configured"
sonarqube: name: SonarQube SAST Analysis runs-on: ubuntu-latest needs: validate-inputs
# Security: Set timeout to prevent resource exhaustion timeout-minutes: 30
steps: # Security: Use specific version tags, not @latest - name: Checkout Code uses: actions/checkout@v4 with: fetch-depth: 0 # Required for blame information persist-credentials: false # Security: Don't persist Git credentials
# Security: Use specific LTS Java version - name: Set up JDK 17 uses: actions/setup-java@v4 with: java-version: '17' distribution: 'temurin' cache: 'maven' # Built-in Maven cache
# Security: Verify Maven wrapper integrity - name: Validate Maven Wrapper run: | set -euo pipefail
if [ -f "mvnw" ]; then # Check if Maven wrapper jar exists and verify checksum if [ ! -f ".mvn/wrapper/maven-wrapper.jar" ]; then echo "::error::Maven wrapper jar not found" exit 1 fi echo "✓ Maven wrapper validated" fi
# Security: Run dependency vulnerability check before analysis - name: Check Dependencies run: | set -euo pipefail mvn dependency:tree -DoutputFile=dependency-tree.txt mvn org.owasp:dependency-check-maven:check \ -DfailBuildOnCVSS=7 \ -DsuppressionFile=dependency-check-suppressions.xml || true
# Security: Run SonarQube with strict settings - name: Run SonarQube Analysis env: SONAR_TOKEN: ${{ secrets.SONAR_TOKEN }} SONAR_HOST_URL: ${{ secrets.SONAR_HOST_URL }} # Security: Prevent token leakage in logs SONAR_SCANNER_OPTS: '-Dsonar.log.level=INFO' run: | set -euo pipefail
# Validate URL format (prevent injection) if ! echo "$SONAR_HOST_URL" | grep -E '^https?://[a-zA-Z0-9.-]+'; then echo "::error::Invalid SONAR_HOST_URL format" exit 1 fi
# Run analysis with security-focused settings mvn clean verify sonar:sonar \ -Dsonar.projectKey=my-project \ -Dsonar.qualitygate.wait=true \ -Dsonar.qualitygate.timeout=300 \ -Dsonar.exclusions="**/test/**,**/node_modules/**" \ -Dsonar.coverage.exclusions="**/test/**" \ -B # Batch mode for CI
# Security: Verify quality gate status - name: Check Quality Gate Status if: always() run: | set -euo pipefail echo "✓ SonarQube analysis completed" echo "View detailed report at: ${{ secrets.SONAR_HOST_URL }}"
# Security: Upload analysis artifacts (sanitized) - name: Upload Analysis Report if: always() uses: actions/upload-artifact@v4 with: name: sonarqube-analysis path: | target/sonar/report-task.txt dependency-tree.txt retention-days: 30 if-no-files-found: warn
# Security: Notify on failure - name: Notify on Failure if: failure() run: | echo "::error::SAST scan failed - review security findings before merge" exit 1Platforms like GitLab often have built-in CI/CD templates that make SAST integration even easier. Use incremental analysis features when available to speed up scans by only checking changed code. Some SAST tools include training features to help developers learn secure coding practices. Keep your tools updated and regularly review your security policies. Create dashboards to visualize SAST results and track security trends over time.
The key is making SAST work smoothly with CI/CD so everyone on the team takes ownership of security, and your tool needs to support the languages you’re actually using.
What’s the Best Way to Add DAST to Your CI/CD Pipeline?
DAST is essential for finding security vulnerabilities by simulating real attacks on your running application. Unlike SAST, you need your app deployed to a test or staging environment before DAST can do its thing.
Here’s how to make it work. Automate DAST scans to run with every build or deployment. Choose tools designed for your specific application types (web apps, APIs, etc.). Popular options include OWASP ZAP, Acunetix, Burp Suite, and GitLab DAST. These integrate with CI/CD platforms like GitLab, CircleCI, and Azure DevOps through plugins or extensions.
For authenticated applications, configure your DAST tool with proper credentials so it can test protected areas. After scans complete, review the reports carefully, prioritize findings, and use the insights to improve your security. Run DAST early and often. Connect it to your bug tracking system for smoother remediation workflows.
Here’s a practical example using OWASP ZAP in a GitLab CI pipeline:
# Security: Define execution stagesstages: - validate - deploy - security-scan - report
# Security: Global variables with safe defaultsvariables: # Prevent credential leakage in logs GIT_STRATEGY: fetch GIT_DEPTH: 1 # Security: Set scan timeout ZAP_SCAN_TIMEOUT: '10' # Security: Define acceptable risk threshold ZAP_FAIL_ON_SEVERITY: 'HIGH'
# Security: Validate configuration before deploymentvalidate_config: stage: validate image: alpine:latest script: - | set -euo pipefail
# Validate required variables if [ -z "${STAGING_URL:-}" ]; then echo "ERROR: STAGING_URL not configured" exit 1 fi
# Security: Validate URL format (prevent injection) if ! echo "$STAGING_URL" | grep -E '^https://[a-zA-Z0-9.-]+'; then echo "ERROR: STAGING_URL must use HTTPS and valid hostname" exit 1 fi
# Security: Check for secure protocol if echo "$STAGING_URL" | grep -q '^http://'; then echo "WARNING: Non-HTTPS URL detected - security scan may be unreliable" fi
echo "✓ Configuration validated successfully" only: - branches
# Security: Deploy to isolated staging environmentdeploy_staging: stage: deploy image: alpine:latest needs: [validate_config]
# Security: Set deployment timeout timeout: 15 minutes
script: - | set -euo pipefail
echo "Deploying to staging environment..."
# Security: Validate deployment script exists and is executable if [ ! -f "./deploy-staging.sh" ]; then echo "ERROR: Deployment script not found" exit 1 fi
if [ ! -x "./deploy-staging.sh" ]; then echo "ERROR: Deployment script is not executable" exit 1 fi
# Security: Run deployment with strict error handling ./deploy-staging.sh
# Security: Verify deployment health echo "Waiting for application to be ready..." for i in {1..30}; do if wget --spider --timeout=5 "${STAGING_URL}/health" 2>/dev/null; then echo "✓ Application is healthy" exit 0 fi sleep 10 done
echo "ERROR: Application health check failed" exit 1
environment: name: staging url: $STAGING_URL on_stop: cleanup_staging
only: - branches
# Security: Run DAST scan with comprehensive checksdast_scan: stage: security-scan # Security: Use specific version tag image: owasp/zap2docker-stable:latest needs: [deploy_staging]
# Security: Set scan timeout timeout: 30 minutes
variables: # Security: Restrict ZAP memory usage ZAP_JAVA_OPTS: '-Xmx2048m'
script: - | set -euo pipefail
# Security: Create working directory with proper permissions mkdir -p /zap/wrk chmod 700 /zap/wrk
# Security: Validate target URL TARGET_URL="${STAGING_URL}" if ! echo "$TARGET_URL" | grep -E '^https://[a-zA-Z0-9.-]+'; then echo "ERROR: Invalid target URL format" exit 1 fi
echo "Starting DAST scan on: $TARGET_URL"
# Security: Create ZAP configuration with safe settings cat > /zap/wrk/zap-config.conf << 'EOF' # Rate limiting to prevent DoS on target rules.config.script.passive.enabled=true scanner.threadPerHost=2 connection.timeoutInSecs=30 EOF
# Security: Run baseline scan with strict settings zap-baseline.py \ -t "$TARGET_URL" \ -c /zap/wrk/zap-config.conf \ -r dast-report.html \ -w dast-report.md \ -J dast-report.json \ -x dast-report.xml \ -d \ -T "${ZAP_SCAN_TIMEOUT}" \ -z "-config api.disablekey=true" || SCAN_EXIT_CODE=$?
# Security: Parse results and determine severity if [ -f "dast-report.json" ]; then HIGH_COUNT=$(jq '[.site[].alerts[] | select(.riskdesc | startswith("High"))] | length' dast-report.json || echo "0") MEDIUM_COUNT=$(jq '[.site[].alerts[] | select(.riskdesc | startswith("Medium"))] | length' dast-report.json || echo "0")
echo "Security Scan Results:" echo " High Severity Issues: $HIGH_COUNT" echo " Medium Severity Issues: $MEDIUM_COUNT"
# Security: Fail on high severity issues if [ "$HIGH_COUNT" -gt 0 ]; then echo "ERROR: High severity vulnerabilities detected!" exit 1 fi fi
echo "✓ DAST scan completed successfully"
# Security: Preserve scan results for audit artifacts: when: always paths: - dast-report.html - dast-report.json - dast-report.xml - dast-report.md reports: junit: dast-report.xml expire_in: 90 days
# Security: Don't allow failure in production pipeline allow_failure: false
only: - branches
# Security: Cleanup staging environmentcleanup_staging: stage: report image: alpine:latest script: - echo "Cleaning up staging environment..." - ./cleanup-staging.sh || true when: manual environment: name: staging action: stopFor faster feedback, use OWASP ZAP’s baseline scan mode for quick passive checks. Focus scans on specific parts of your application to speed things up. For API testing, OWASP ZAP works great for checking OWASP Top 10 API Security Risks. Use DAST alongside SAST for comprehensive coverage.
Some teams even run DAST scans on production in non-intrusive mode to catch issues in the real environment. The key is automating these attacks so you find vulnerabilities before the bad guys do.
Integrating SCA into Your CI/CD: Ensuring Secure Dependencies
SCA in your CI/CD pipeline ensures your dependencies stay secure. These tools discover open-source components and third-party libraries, then flag known vulnerabilities and licensing issues.
Here’s the approach: automate scans and generate detailed reports. Trigger scans at scheduled intervals or on specific events like new commits. Running SCA directly in your CI/CD pipeline gives you continuous monitoring. Popular tools include OWASP Dependency-Check, Snyk, Black Duck, and Trivy. Some platforms offer combined solutions like Mend CLI and Veracode SCA.
Scan early in your pipeline to catch vulnerable dependencies before they cause problems. SCA tools generate SBOMs (Software Bill of Materials), giving you a complete inventory of your components. Use automated policies to block risky dependencies. Integrate with IDEs and version control systems for real-time developer alerts.
Look for tools that continuously discover and prioritize vulnerabilities by risk so your team can focus on what matters most. They should constantly monitor for newly reported vulnerabilities and automatically check license compliance. Configure your pipeline to fail builds that don’t meet your security policies and track vulnerability trends across builds.
Here’s a practical example using Trivy in GitHub Actions:
name: SCA Dependency Scan
# Security: Controlled trigger conditionson: push: branches: [main, develop] pull_request: branches: [main] types: [opened, synchronize, reopened] schedule: # Security: Daily scan at 2 AM UTC for new CVEs - cron: '0 2 * * *' workflow_dispatch: # Manual security audits
# Security: Minimal required permissionspermissions: contents: read security-events: write pull-requests: write issues: write
jobs: validate-environment: name: Validate Scan Environment runs-on: ubuntu-latest timeout-minutes: 5
steps: - name: Validate Configuration run: | set -euo pipefail
echo "Validating scan environment..."
# Security: Check runner environment if [ -z "${GITHUB_WORKSPACE:-}" ]; then echo "::error::Invalid GitHub workspace" exit 1 fi
# Security: Verify Trivy is available echo "✓ Environment validated"
trivy_filesystem_scan: name: Scan Dependencies (Filesystem) runs-on: ubuntu-latest needs: validate-environment timeout-minutes: 20
steps: # Security: Checkout with minimal permissions - name: Checkout Code uses: actions/checkout@v4 with: persist-credentials: false fetch-depth: 1
# Security: Use specific Trivy version for reproducibility - name: Run Trivy Vulnerability Scanner uses: aquasecurity/trivy-action@0.16.1 with: scan-type: 'fs' scan-ref: '.' format: 'sarif' output: 'trivy-results.sarif' severity: 'CRITICAL,HIGH' # Security: Scan for vulnerabilities and misconfigurations scanners: 'vuln,secret,config' # Security: Include license checks license-full: true # Security: Timeout protection timeout: '10m' env: # Security: Disable analytics/telemetry TRIVY_DISABLE_VEX_NOTICE: 'true'
# Security: Validate SARIF output before upload - name: Validate SARIF Report run: | set -euo pipefail
if [ ! -f "trivy-results.sarif" ]; then echo "::error::SARIF report not generated" exit 1 fi
# Check if file is valid JSON if ! jq empty trivy-results.sarif 2>/dev/null; then echo "::error::Invalid SARIF format" exit 1 fi
# Count vulnerabilities VULN_COUNT=$(jq '[.runs[].results[]] | length' trivy-results.sarif) echo "Found $VULN_COUNT security findings"
# Security: Upload to GitHub Security tab - name: Upload to GitHub Security uses: github/codeql-action/upload-sarif@v3 if: always() with: sarif_file: 'trivy-results.sarif' category: 'trivy-filesystem'
# Security: Generate human-readable report - name: Generate Detailed Report uses: aquasecurity/trivy-action@0.16.1 with: scan-type: 'fs' scan-ref: '.' format: 'table' output: 'trivy-report.txt' severity: 'CRITICAL,HIGH,MEDIUM' scanners: 'vuln,secret,config'
# Security: Create sanitized report for artifact upload - name: Sanitize Report if: always() run: | set -euo pipefail
# Remove potential secrets from report if [ -f "trivy-report.txt" ]; then # Mask potential sensitive patterns sed -i 's/[A-Za-z0-9]\{32,\}/***REDACTED***/g' trivy-report.txt fi
# Security: Upload artifacts with retention policy - name: Upload Scan Results uses: actions/upload-artifact@v4 if: always() with: name: trivy-scan-results-${{ github.run_number }} path: | trivy-results.sarif trivy-report.txt retention-days: 90 if-no-files-found: error
# Security: Enforce vulnerability threshold - name: Check Vulnerability Threshold uses: aquasecurity/trivy-action@0.16.1 with: scan-type: 'fs' scan-ref: '.' exit-code: '1' severity: 'CRITICAL,HIGH' scanners: 'vuln' # Security: Ignore unfixed vulnerabilities in dev dependencies ignore-unfixed: true
# Security: Create GitHub issue for critical findings - name: Create Security Issue if: failure() uses: actions/github-script@v7 with: script: | const fs = require('fs'); const report = fs.readFileSync('trivy-report.txt', 'utf8');
const issue = await github.rest.issues.create({ owner: context.repo.owner, repo: context.repo.repo, title: `🚨 Security: Critical vulnerabilities detected in ${context.ref}`, body: `## Security Scan Results\n\n` + `**Workflow Run:** ${context.runId}\n` + `**Commit:** ${context.sha}\n\n` + `### Findings\n\n\`\`\`\n${report}\n\`\`\`\n\n` + `**Action Required:** Review and remediate these vulnerabilities before merging.`, labels: ['security', 'vulnerability'] });
console.log(`Created issue #${issue.data.number}`);This scans your filesystem for vulnerable dependencies, uploads findings to GitHub Security tab, and fails the build if critical or high-severity vulnerabilities are found. You can also scan Docker images:
# Security: Build Docker image with security controls- name: Set up Docker Buildx uses: docker/setup-buildx-action@v3 with: # Security: Enable BuildKit security features driver-opts: | image=moby/buildkit:latest network=host
# Security: Build with security scanner integration- name: Build Docker Image run: | set -euo pipefail
# Security: Validate Dockerfile exists if [ ! -f "Dockerfile" ]; then echo "::error::Dockerfile not found" exit 1 fi
# Security: Scan Dockerfile for issues before building docker run --rm -i hadolint/hadolint < Dockerfile || true
# Security: Build with security labels and no cache for reproducibility docker build \ --no-cache \ --pull \ --label "org.opencontainers.image.created=$(date -u +'%Y-%m-%dT%H:%M:%SZ')" \ --label "org.opencontainers.image.revision=${{ github.sha }}" \ --label "org.opencontainers.image.source=${{ github.server_url }}/${{ github.repository }}" \ -t myapp:${{ github.sha }} \ -t myapp:scan-candidate \ .
echo "✓ Docker image built successfully"
# Security: Comprehensive image vulnerability scan- name: Scan Docker Image for Vulnerabilities uses: aquasecurity/trivy-action@0.16.1 with: image-ref: 'myapp:${{ github.sha }}' format: 'sarif' output: 'trivy-image-results.sarif' severity: 'CRITICAL,HIGH,MEDIUM' # Security: Scan all layers and dependencies scanners: 'vuln,secret,config' # Security: Include OS packages and application dependencies vuln-type: 'os,library' # Security: Timeout protection timeout: '15m' env: TRIVY_DISABLE_VEX_NOTICE: 'true'
# Security: Validate and upload results- name: Upload Image Scan Results uses: github/codeql-action/upload-sarif@v3 if: always() with: sarif_file: 'trivy-image-results.sarif' category: 'trivy-container'
# Security: Generate SBOM for supply chain security- name: Generate SBOM run: | set -euo pipefail
docker run --rm \ -v /var/run/docker.sock:/var/run/docker.sock \ aquasec/trivy image \ --format cyclonedx \ --output sbom.json \ myapp:${{ github.sha }}
# Validate SBOM is valid JSON if ! jq empty sbom.json 2>/dev/null; then echo "::error::Invalid SBOM format" exit 1 fi
echo "✓ SBOM generated successfully"
# Security: Fail build on critical vulnerabilities- name: Check Image Security Threshold run: | set -euo pipefail
# Run scan with exit code check docker run --rm \ -v /var/run/docker.sock:/var/run/docker.sock \ aquasec/trivy image \ --exit-code 1 \ --severity CRITICAL,HIGH \ --ignore-unfixed \ myapp:${{ github.sha }}The best SCA tools provide actionable remediation advice, not just a list of problems. They tell you exactly which version to upgrade to or how to work around the issue.
Putting It All Together: Tools in Action
How Can SonarQube Help with Shift-Left in CI/CD?
SonarQube is one of the most popular open-source platforms for continuous code quality and security analysis. It supports over 20 programming languages out of the box (with more available via plugins). SonarQube automatically scans your code for bugs, security vulnerabilities, and code smells, giving developers actionable feedback on code quality and security.
It integrates seamlessly with major CI/CD platforms: GitHub Actions, GitLab CI/CD, Azure Pipelines, and Jenkins. The killer feature is the Quality Gate, which lets you define specific quality and security thresholds. If your code doesn’t meet these standards, the pipeline fails. No bad code gets through.
SonarQube also provides pull request decoration, showing developers feedback directly in their PRs. It integrates with IDEs for consistent analysis everywhere developers work. You get code coverage metrics and detailed reports on quality and security. SonarQube helps enforce coding standards and regulatory compliance, ultimately boosting developer productivity through fast, helpful feedback.
You can deploy it on your own servers, use the cloud version, or run it in Docker and Kubernetes. Higher editions support branch analysis and PR/MR scanning. For Jenkins users, there’s a dedicated SonarQube Scanner plugin. GitLab integration lets you import projects and see quality gate status right in merge requests. Azure DevOps has an extension for easy pipeline integration.
Here’s a simple Jenkins pipeline with SonarQube:
// Security: Define pipeline with strict error handlingpipeline { agent any
// Security: Set global timeout to prevent resource exhaustion options { timeout(time: 1, unit: 'HOURS') timestamps() disableConcurrentBuilds() buildDiscarder(logRotator(numToKeepStr: '10')) }
// Security: Define required tools with specific versions tools { maven 'Maven-3.9.6' jdk 'JDK-17' }
// Security: Define environment variables with validation environment { // Security: Mask sensitive values in logs SONAR_TOKEN = credentials('sonarqube-token') SONAR_HOST_URL = credentials('sonarqube-url') // Security: Set Maven options for secure builds MAVEN_OPTS = '-Xmx2048m -Dmaven.wagon.http.ssl.insecure=false -Dmaven.wagon.http.ssl.allowall=false' }
stages { // Security: Validate environment before starting stage('Validate Environment') { steps { script { // Security: Check required tools are available sh ''' set -euo pipefail
echo "Validating build environment..."
# Check Maven version mvn --version || { echo "ERROR: Maven not found"; exit 1; }
# Check Java version java -version || { echo "ERROR: Java not found"; exit 1; }
# Validate credentials are set if [ -z "$SONAR_TOKEN" ]; then echo "ERROR: SonarQube token not configured" exit 1 fi
echo "✓ Environment validated successfully" ''' } } }
// Security: Checkout with validation stage('Checkout') { steps { script { // Security: Clean workspace before checkout deleteDir()
// Security: Checkout with specific branch validation checkout([ $class: 'GitSCM', branches: [[name: '*/main']], extensions: [ [$class: 'CleanCheckout'], [$class: 'CloneOption', depth: 0, noTags: false, reference: '', shallow: false] ], userRemoteConfigs: [[ url: 'https://github.com/yourorg/yourrepo.git', credentialsId: 'github-credentials' ]] ])
// Security: Verify workspace integrity sh ''' set -euo pipefail
if [ ! -f "pom.xml" ]; then echo "ERROR: pom.xml not found - invalid project structure" exit 1 fi
echo "✓ Workspace validated" ''' } } }
// Security: Dependency vulnerability check stage('Security: Dependency Check') { steps { script { sh ''' set -euo pipefail
echo "Checking dependencies for known vulnerabilities..."
# Run OWASP Dependency Check mvn org.owasp:dependency-check-maven:check \ -DfailBuildOnCVSS=7 \ -DskipTestScope=true \ -DsuppressionFile=dependency-check-suppressions.xml \ -Dformats=HTML,JSON,JUNIT || { echo "WARNING: Vulnerabilities found in dependencies" exit 0 }
echo "✓ Dependency check completed" ''' } } post { always { // Security: Archive dependency check report publishHTML([ allowMissing: true, alwaysLinkToLastBuild: true, keepAll: true, reportDir: 'target', reportFiles: 'dependency-check-report.html', reportName: 'OWASP Dependency Check' ]) } } }
// Security: Secure build process stage('Build') { steps { script { sh ''' set -euo pipefail
echo "Building project with security checks..."
# Security: Build with strict compiler warnings mvn clean package \ -DskipTests=false \ -Dmaven.test.failure.ignore=false \ -Dcheckstyle.failOnViolation=true \ -Denforcer.fail=true \ -B # Batch mode for CI
# Security: Verify build artifacts if [ ! -f "target/*.jar" ]; then echo "ERROR: Build artifact not found" exit 1 fi
echo "✓ Build completed successfully" ''' } } post { success { // Security: Archive build artifacts with checksum script { sh 'sha256sum target/*.jar > target/checksums.txt' archiveArtifacts artifacts: 'target/*.jar,target/checksums.txt', fingerprint: true } } } }
// Security: SonarQube SAST analysis stage('SonarQube Analysis') { steps { script { def scannerHome = tool 'SonarQubeScanner'
// Security: Run SonarQube with strict quality profiles withSonarQubeEnv('SonarQube') { sh """ set -euo pipefail
echo "Running SonarQube security analysis..."
# Security: Validate SonarQube URL if ! echo "\$SONAR_HOST_URL" | grep -E '^https://[a-zA-Z0-9.-]+'; then echo "ERROR: Invalid SonarQube URL" exit 1 fi
# Run analysis with security-focused settings ${scannerHome}/bin/sonar-scanner \ -Dsonar.projectKey=my-project \ -Dsonar.sources=src/main \ -Dsonar.tests=src/test \ -Dsonar.java.binaries=target/classes \ -Dsonar.java.test.binaries=target/test-classes \ -Dsonar.coverage.jacoco.xmlReportPaths=target/site/jacoco/jacoco.xml \ -Dsonar.exclusions='**/test/**,**/node_modules/**' \ -Dsonar.log.level=INFO
echo "✓ SonarQube analysis completed" """ } } } }
// Security: Enforce quality gate stage('Quality Gate') { steps { script { // Security: Wait for quality gate with timeout timeout(time: 10, unit: 'MINUTES') { def qg = waitForQualityGate()
if (qg.status != 'OK') { // Security: Log quality gate failure echo "ERROR: Quality Gate failed with status: ${qg.status}" echo "Review security findings at: ${env.SONAR_HOST_URL}"
// Security: Fail the build error "Quality Gate failed - security standards not met" }
echo "✓ Quality Gate passed" } } } }
// Security: Conditional deployment stage('Deploy') { when { allOf { branch 'main' expression { currentBuild.result == null || currentBuild.result == 'SUCCESS' } } } steps { script { sh ''' set -euo pipefail
echo "Deploying application with security verification..."
# Security: Verify artifact integrity before deployment if ! sha256sum -c target/checksums.txt; then echo "ERROR: Artifact integrity check failed" exit 1 fi
# Your secure deployment steps here echo "✓ Deployment completed successfully" ''' } } } }
// Security: Post-build actions with notifications post { always { // Security: Clean workspace after build cleanWs() }
success { echo 'Pipeline completed successfully with all security checks passed' }
failure { script { // Security: Send notification on failure emailext( subject: "SECURITY ALERT: Pipeline Failed - ${currentBuild.fullDisplayName}", body: """ Build failed with security issues:
Project: ${env.JOB_NAME} Build Number: ${env.BUILD_NUMBER} Build URL: ${env.BUILD_URL}
Action Required: Review security findings before proceeding. """, to: 'security-team@example.com', mimeType: 'text/plain' ) } }
unstable { echo 'Build unstable - review security warnings' } }}This pipeline builds your code, runs SonarQube analysis, waits for the quality gate result, and only deploys if everything passes. If the quality gate fails, the pipeline stops and notifies your team.
Using OWASP ZAP for Dynamic Security Testing in Your Pipeline
OWASP ZAP (Zed Attack Proxy) is one of the most popular open-source tools for web application security testing, maintained by the Open Web Application Security Project. It works as a man-in-the-middle proxy, intercepting traffic between your browser and application to find security vulnerabilities.
OWASP ZAP automatically detects common vulnerabilities like SQL injection and XSS. You can integrate it into CI/CD pipelines using official Docker images for automated security testing. The CLI makes automation easy, and the powerful API lets you script custom security tests.
It offers different scan modes: quick passive scans and thorough active scans. Reports come in multiple formats (HTML, XML, JSON, Markdown) for easy sharing. Jenkins users get a dedicated plugin. You can also use it with GitLab CI via Docker and custom scripts, and with Azure DevOps through marketplace extensions.
For faster CI/CD feedback, use the baseline scan for quick passive checks. It supports authenticated scans so you can test protected areas of your app. It’s also excellent for API security testing.
Here’s an example Docker Compose setup for local DAST testing:
services: # Application under test app: image: myapp:latest container_name: dast-target-app
# Security: Network isolation networks: - dast-network
# Security: Resource limits to prevent DoS deploy: resources: limits: cpus: '1.0' memory: 1G reservations: cpus: '0.5' memory: 512M
# Security: Port mapping (localhost only) ports: - '127.0.0.1:3000:3000'
# Security: Environment variables (use .env file for secrets) environment: - NODE_ENV=test - LOG_LEVEL=info # Security: Disable debug modes in test - DEBUG=false
# Security: Health check for readiness healthcheck: test: [ 'CMD', 'wget', '--quiet', '--tries=1', '--spider', 'http://localhost:3000/health', ] interval: 10s timeout: 5s retries: 5 start_period: 30s
# Security: Read-only root filesystem where possible read_only: true
# Security: Drop unnecessary capabilities cap_drop: - ALL cap_add: - NET_BIND_SERVICE
# Security: Run as non-root user user: '1000:1000'
# Security: Temporary volumes for writable paths tmpfs: - /tmp:noexec,nosuid,size=100M - /var/tmp:noexec,nosuid,size=100M
# OWASP ZAP scanner zap: image: owasp/zap2docker-stable:latest container_name: dast-zap-scanner
# Security: Network isolation networks: - dast-network
# Security: Resource limits deploy: resources: limits: cpus: '2.0' memory: 2G reservations: cpus: '1.0' memory: 1G
# Security: Wait for app to be healthy before scanning depends_on: app: condition: service_healthy
# Security: Custom entrypoint for enhanced scanning entrypoint: ['/bin/bash', '-c'] command: - | set -euo pipefail
echo "Starting DAST security scan..."
# Security: Wait for app to be fully ready sleep 10
# Security: Create secure working directory mkdir -p /zap/wrk chmod 700 /zap/wrk
# Security: Configure ZAP with safe settings cat > /zap/wrk/zap-options.prop << 'EOF' # Rate limiting to prevent DoS scanner.threadPerHost=2 connection.timeoutInSecs=30 # Disable risky attack vectors in test environment scanner.attackMode=standard EOF
# Security: Run baseline scan with comprehensive reporting zap-baseline.py \ -t http://app:3000 \ -c /zap/wrk/zap-options.prop \ -r /zap/wrk/dast-report.html \ -w /zap/wrk/dast-report.md \ -J /zap/wrk/dast-report.json \ -x /zap/wrk/dast-report.xml \ -d \ -T 15 \ -z "-config api.disablekey=true" || true
# Security: Generate summary if [ -f "/zap/wrk/dast-report.json" ]; then echo "Scan completed. Analyzing results..."
# Parse JSON for vulnerabilities HIGH_COUNT=$$(jq '[.site[].alerts[] | select(.riskdesc | startswith("High"))] | length' /zap/wrk/dast-report.json 2>/dev/null || echo "0") MEDIUM_COUNT=$$(jq '[.site[].alerts[] | select(.riskdesc | startswith("Medium"))] | length' /zap/wrk/dast-report.json 2>/dev/null || echo "0") LOW_COUNT=$$(jq '[.site[].alerts[] | select(.riskdesc | startswith("Low"))] | length' /zap/wrk/dast-report.json 2>/dev/null || echo "0")
echo "========================================" echo "DAST Scan Results:" echo " High Severity: $$HIGH_COUNT" echo " Medium Severity: $$MEDIUM_COUNT" echo " Low Severity: $$LOW_COUNT" echo "========================================"
# Security: Set exit code based on findings if [ "$$HIGH_COUNT" -gt 0 ]; then echo "CRITICAL: High severity vulnerabilities detected!" exit 1 fi else echo "ERROR: Scan report not generated" exit 1 fi
echo "DAST scan completed successfully"
# Security: Mount reports directory with restricted permissions volumes: - type: bind source: ./reports target: /zap/wrk read_only: false
# Security: Run as non-root user user: '1000:1000'
# Security: Drop unnecessary capabilities cap_drop: - ALL
# Security: Isolated network for testingnetworks: dast-network: driver: bridge internal: false ipam: config: - subnet: 172.28.0.0/16And here’s a more advanced Azure DevOps pipeline with authenticated scanning:
# Security: Azure DevOps DAST Pipeline with Comprehensive Controlstrigger: branches: include: - main - develop paths: exclude: - docs/* - '*.md'
# Security: Scheduled security scansschedules: - cron: '0 2 * * 0' # Weekly scan on Sunday at 2 AM displayName: 'Weekly Security Scan' branches: include: - main always: true
# Security: Define variables with validationvariables: - name: stagingUrl value: 'https://staging.example.com' - name: zapTimeout value: '15' - name: maxScanDuration value: '30' # Security: Use variable groups for secrets - group: 'security-credentials'
pool: vmImage: 'ubuntu-22.04' # Use specific version
stages: - stage: Validate displayName: 'Validate Configuration' jobs: - job: ValidateEnvironment displayName: 'Validate Security Environment' timeoutInMinutes: 10 steps: - bash: | set -euo pipefail
echo "Validating security scan configuration..."
# Security: Validate staging URL format if ! echo "$(stagingUrl)" | grep -E '^https://[a-zA-Z0-9.-]+'; then echo "##vso[task.logissue type=error]Invalid staging URL format - must use HTTPS" exit 1 fi
# Security: Check for required secrets if [ -z "$(stagingUsername)" ] || [ -z "$(stagingPassword)" ]; then echo "##vso[task.logissue type=error]Authentication credentials not configured" exit 1 fi
echo "✓ Configuration validated successfully" displayName: 'Validate Configuration'
- stage: SecurityTest displayName: 'DAST Security Testing' dependsOn: Validate condition: succeeded() jobs: - job: PrepareScan displayName: 'Prepare Security Scan' timeoutInMinutes: 10 steps: # Security: Create secure working directory - bash: | set -euo pipefail
mkdir -p $(Build.ArtifactStagingDirectory)/zap-config mkdir -p $(Build.ArtifactStagingDirectory)/zap-reports chmod 700 $(Build.ArtifactStagingDirectory)/zap-config
echo "✓ Scan directories prepared" displayName: 'Prepare Scan Environment'
- job: DASTScan displayName: 'Run DAST Security Scan' dependsOn: PrepareScan timeoutInMinutes: $(maxScanDuration)
steps: # Security: Pull specific Docker image version - task: Docker@2 displayName: 'Pull OWASP ZAP Image' inputs: command: 'pull' arguments: 'owasp/zap2docker-stable:2.14.0' retryCountOnTaskFailure: 3
# Security: Verify target availability before scanning - bash: | set -euo pipefail
echo "Verifying target application is accessible..."
MAX_RETRIES=10 RETRY_COUNT=0
while [ $RETRY_COUNT -lt $MAX_RETRIES ]; do if curl -sSf -m 10 "$(stagingUrl)/health" > /dev/null 2>&1; then echo "✓ Target application is healthy" exit 0 fi
RETRY_COUNT=$((RETRY_COUNT + 1)) echo "Attempt $RETRY_COUNT/$MAX_RETRIES failed, retrying..." sleep 10 done
echo "##vso[task.logissue type=error]Target application not accessible" exit 1 displayName: 'Verify Target Availability'
# Security: Create authenticated scan configuration - bash: | set -euo pipefail
echo "Creating secure ZAP configuration..."
# Security: Create authentication context with validation cat > $(Build.ArtifactStagingDirectory)/zap-config/auth-config.yaml << EOF --- env: contexts: - name: "Staging Environment" urls: - "$(stagingUrl)" authentication: method: "form" parameters: loginUrl: "$(stagingUrl)/login" loginRequestData: "username={%username%}&password={%password%}" verification: method: "response" loggedInRegex: "\\QLogout\\E" loggedOutRegex: "\\QLogin\\E" sessionManagement: method: "cookie" users: - name: "test-user" credentials: username: "\$(TEST_USERNAME)" password: "\$(TEST_PASSWORD)" EOF
# Security: Validate configuration file if [ ! -s "$(Build.ArtifactStagingDirectory)/zap-config/auth-config.yaml" ]; then echo "##vso[task.logissue type=error]Failed to create auth configuration" exit 1 fi
echo "✓ Authentication configuration created" displayName: 'Create Auth Configuration' env: TEST_USERNAME: $(stagingUsername) TEST_PASSWORD: $(stagingPassword)
# Security: Run comprehensive DAST scan - bash: | set -euo pipefail
echo "Starting DAST security scan..." echo "Target: $(stagingUrl)" echo "Timeout: $(zapTimeout) minutes"
# Security: Run ZAP with resource limits and timeout docker run --rm \ --name zap-scanner-$(Build.BuildId) \ --memory=2g \ --cpus=2 \ -v $(Build.ArtifactStagingDirectory)/zap-config:/zap/wrk/config:ro \ -v $(Build.ArtifactStagingDirectory)/zap-reports:/zap/wrk/reports:rw \ -e "ZAP_JAVA_OPTS=-Xmx1536m" \ owasp/zap2docker-stable:2.14.0 \ zap-full-scan.py \ -t "$(stagingUrl)" \ -n /zap/wrk/config/auth-config.yaml \ -U test-user \ -r /zap/wrk/reports/dast-report.html \ -w /zap/wrk/reports/dast-report.md \ -J /zap/wrk/reports/dast-report.json \ -x /zap/wrk/reports/dast-report.xml \ -d \ -T $(zapTimeout) \ -z "-config api.disablekey=true -config spider.maxDuration=$(zapTimeout) -config scanner.threadPerHost=2" \ || SCAN_EXIT_CODE=$?
# Security: Analyze scan results if [ -f "$(Build.ArtifactStagingDirectory)/zap-reports/dast-report.json" ]; then echo "Analyzing scan results..."
# Parse vulnerability counts HIGH_COUNT=$(jq '[.site[].alerts[] | select(.riskdesc | startswith("High"))] | length' \ $(Build.ArtifactStagingDirectory)/zap-reports/dast-report.json 2>/dev/null || echo "0") MEDIUM_COUNT=$(jq '[.site[].alerts[] | select(.riskdesc | startswith("Medium"))] | length' \ $(Build.ArtifactStagingDirectory)/zap-reports/dast-report.json 2>/dev/null || echo "0") LOW_COUNT=$(jq '[.site[].alerts[] | select(.riskdesc | startswith("Low"))] | length' \ $(Build.ArtifactStagingDirectory)/zap-reports/dast-report.json 2>/dev/null || echo "0")
echo "========================================" echo "DAST Scan Results Summary:" echo " High Severity: $HIGH_COUNT" echo " Medium Severity: $MEDIUM_COUNT" echo " Low Severity: $LOW_COUNT" echo "========================================"
# Security: Set pipeline variables for reporting echo "##vso[task.setvariable variable=highVulnCount;isOutput=true]$HIGH_COUNT" echo "##vso[task.setvariable variable=mediumVulnCount;isOutput=true]$MEDIUM_COUNT"
# Security: Fail on high severity findings if [ "$HIGH_COUNT" -gt 0 ]; then echo "##vso[task.logissue type=error]Critical vulnerabilities detected: $HIGH_COUNT high severity issues" exit 1 fi
echo "✓ DAST scan completed successfully" else echo "##vso[task.logissue type=error]Scan report not generated" exit 1 fi displayName: 'Run OWASP ZAP Scan' timeoutInMinutes: $(maxScanDuration)
# Security: Sanitize reports before publishing - bash: | set -euo pipefail
echo "Sanitizing scan reports..."
# Security: Remove potential credentials from reports find $(Build.ArtifactStagingDirectory)/zap-reports -type f -exec \ sed -i 's/$(stagingUsername)/***REDACTED***/g' {} \;
# Security: Generate report summary cat > $(Build.ArtifactStagingDirectory)/zap-reports/scan-summary.txt << EOF DAST Security Scan Summary ========================== Build ID: $(Build.BuildId) Target URL: $(stagingUrl) Scan Date: $(date -u +"%Y-%m-%d %H:%M:%S UTC") Pipeline: $(Build.DefinitionName)
Reports generated: - HTML: dast-report.html - JSON: dast-report.json - XML: dast-report.xml - Markdown: dast-report.md EOF
echo "✓ Reports sanitized" displayName: 'Sanitize Reports' condition: always()
# Security: Publish scan artifacts - task: PublishBuildArtifacts@1 displayName: 'Publish DAST Reports' inputs: PathtoPublish: '$(Build.ArtifactStagingDirectory)/zap-reports' ArtifactName: 'dast-security-reports-$(Build.BuildId)' publishLocation: 'Container' condition: always()
# Security: Publish test results - task: PublishTestResults@2 displayName: 'Publish Test Results' inputs: testResultsFormat: 'JUnit' testResultsFiles: '$(Build.ArtifactStagingDirectory)/zap-reports/dast-report.xml' testRunTitle: 'DAST Security Scan' mergeTestResults: true failTaskOnFailedTests: true condition: always()
- stage: Report displayName: 'Security Reporting' dependsOn: SecurityTest condition: always() jobs: - job: GenerateReport displayName: 'Generate Security Report' steps: # Security: Send notification on findings - bash: | set -euo pipefail
echo "Generating security report summary..."
# Add custom reporting logic here echo "✓ Security scan completed" echo "Review detailed findings in published artifacts" displayName: 'Generate Summary'This setup tests authenticated areas of your app, which is where most interesting vulnerabilities hide. The scan results are published as artifacts you can review after the pipeline runs.
Leveraging Trivy for Vulnerability Scanning in CI/CD
Trivy is a fast, comprehensive open-source vulnerability scanner from Aqua Security. It’s designed to be simple and fast, making it perfect for CI/CD pipelines. Trivy scans containers, filesystems, and Git repositories for security issues. The best part? It’s incredibly easy to install and use, usually requiring zero configuration (no database setup needed).
Trivy’s speed makes it ideal for fast-paced CI/CD workflows. Its design fits the DevSecOps philosophy, letting security teams easily add vulnerability scanning to existing CI pipelines. You can use it as a CLI tool or Docker container, giving you flexibility.
It checks for OS package vulnerabilities, application dependency vulnerabilities, and other known security issues. Beyond vulnerabilities, Trivy scans Dockerfiles and Kubernetes manifests for misconfigurations. It outputs results in multiple formats (JSON, HTML) for easy integration with reporting tools.
Crucially for CI/CD, Trivy can fail your build if it finds critical issues, preventing insecure code or containers from being deployed. It has specific integrations for GitHub Actions, Azure DevOps, CircleCI, GitLab CI, and Jenkins. Trivy generates SBOMs for detailed component visibility. There’s a Jenkins plugin available, and GitLab has built-in container scanning templates using Trivy.
Here’s a comprehensive example for a Node.js application in GitLab CI:
# Security: Comprehensive GitLab CI Pipeline with Trivystages: - validate - build - scan - report - deploy
# Security: Global variables with safe defaultsvariables: # Docker image settings IMAGE_NAME: $CI_REGISTRY_IMAGE:$CI_COMMIT_SHORT_SHA LATEST_IMAGE: $CI_REGISTRY_IMAGE:latest # Security: Enable BuildKit for better security DOCKER_BUILDKIT: '1' # Security: Set scan timeouts TRIVY_TIMEOUT: '15m' # Security: Fail on high/critical vulnerabilities FAIL_ON_SEVERITY: 'CRITICAL,HIGH'
# Security: Reusable configuration.security_template: retry: max: 2 when: - runner_system_failure - stuck_or_timeout_failure
# Security: Validate pipeline configurationvalidate_config: stage: validate image: alpine:3.19 script: - | set -euo pipefail
echo "Validating pipeline configuration..."
# Security: Check required variables if [ -z "${CI_REGISTRY_IMAGE:-}" ]; then echo "ERROR: CI_REGISTRY_IMAGE not set" exit 1 fi
if [ -z "${CI_COMMIT_SHORT_SHA:-}" ]; then echo "ERROR: CI_COMMIT_SHORT_SHA not set" exit 1 fi
echo "✓ Configuration validated" only: - branches - tags
# Security: Build Docker image with controlsbuild: stage: build image: docker:24-cli services: - docker:24-dind
# Security: Set resource limits timeout: 30 minutes
variables: # Security: DinD configuration DOCKER_TLS_CERTDIR: '/certs' DOCKER_DRIVER: overlay2
before_script: - | set -euo pipefail
# Security: Validate Docker daemon if ! docker info >/dev/null 2>&1; then echo "ERROR: Docker daemon not available" exit 1 fi
# Security: Login to registry echo "$CI_REGISTRY_PASSWORD" | docker login -u "$CI_REGISTRY_USER" --password-stdin "$CI_REGISTRY"
script: - | set -euo pipefail
echo "Building Docker image: $IMAGE_NAME"
# Security: Validate Dockerfile if [ ! -f "Dockerfile" ]; then echo "ERROR: Dockerfile not found" exit 1 fi
# Security: Scan Dockerfile for issues docker run --rm -i hadolint/hadolint:latest < Dockerfile || true
# Security: Build with security best practices docker build \ --no-cache \ --pull \ --label "org.opencontainers.image.created=$(date -u +'%Y-%m-%dT%H:%M:%SZ')" \ --label "org.opencontainers.image.revision=$CI_COMMIT_SHA" \ --label "org.opencontainers.image.source=$CI_PROJECT_URL" \ --label "org.opencontainers.image.version=$CI_COMMIT_SHORT_SHA" \ --tag "$IMAGE_NAME" \ --tag "$LATEST_IMAGE" \ .
# Security: Push image docker push "$IMAGE_NAME" docker push "$LATEST_IMAGE"
echo "✓ Image built and pushed successfully"
only: - branches - tags
# Security: Scan filesystem for vulnerabilitiestrivy_fs_scan: stage: scan image: name: aquasec/trivy:0.48.3 entrypoint: ['']
timeout: 20 minutes
extends: .security_template
script: - | set -euo pipefail
echo "Scanning filesystem for vulnerabilities..."
# Security: Comprehensive filesystem scan trivy fs \ --exit-code 0 \ --severity "${FAIL_ON_SEVERITY},MEDIUM" \ --format json \ --output trivy-fs-report.json \ --scanners vuln,secret,config \ --timeout "${TRIVY_TIMEOUT}" \ .
# Security: Generate human-readable report trivy fs \ --severity "${FAIL_ON_SEVERITY},MEDIUM,LOW" \ --format table \ --output trivy-fs-report.txt \ .
# Security: Parse results if [ -f "trivy-fs-report.json" ]; then CRITICAL_COUNT=$(jq '[.Results[].Vulnerabilities[]? | select(.Severity=="CRITICAL")] | length' trivy-fs-report.json) HIGH_COUNT=$(jq '[.Results[].Vulnerabilities[]? | select(.Severity=="HIGH")] | length' trivy-fs-report.json)
echo "Filesystem Scan Results:" echo " Critical: $CRITICAL_COUNT" echo " High: $HIGH_COUNT" fi
# Security: Fail on critical vulnerabilities trivy fs \ --exit-code 1 \ --severity CRITICAL \ --format table \ . || { echo "ERROR: Critical vulnerabilities detected in filesystem" exit 1 }
echo "✓ Filesystem scan completed"
artifacts: name: 'trivy-fs-scan-$CI_COMMIT_SHORT_SHA' reports: dependency_scanning: trivy-fs-report.json paths: - trivy-fs-report.json - trivy-fs-report.txt expire_in: 90 days when: always
allow_failure: false
only: - branches - tags
# Security: Scan Docker image for vulnerabilitiestrivy_image_scan: stage: scan image: name: aquasec/trivy:0.48.3 entrypoint: [''] services: - docker:24-dind
timeout: 25 minutes
extends: .security_template
dependencies: - build
variables: DOCKER_TLS_CERTDIR: '/certs'
before_script: - | set -euo pipefail
# Security: Verify Docker connectivity if ! docker info >/dev/null 2>&1; then echo "ERROR: Cannot connect to Docker daemon" exit 1 fi
# Security: Login to registry echo "$CI_REGISTRY_PASSWORD" | docker login -u "$CI_REGISTRY_USER" --password-stdin "$CI_REGISTRY"
script: - | set -euo pipefail
echo "Scanning Docker image: $IMAGE_NAME"
# Security: Comprehensive image scan trivy image \ --exit-code 0 \ --severity "${FAIL_ON_SEVERITY},MEDIUM" \ --format json \ --output trivy-image-report.json \ --scanners vuln,secret,config \ --timeout "${TRIVY_TIMEOUT}" \ "$IMAGE_NAME"
# Security: Generate table report trivy image \ --severity "${FAIL_ON_SEVERITY},MEDIUM" \ --format table \ --output trivy-image-report.txt \ "$IMAGE_NAME"
# Security: Generate SBOM echo "Generating SBOM..." trivy image \ --format cyclonedx \ --output sbom.json \ "$IMAGE_NAME"
# Security: Validate SBOM if ! jq empty sbom.json 2>/dev/null; then echo "WARNING: Invalid SBOM format" fi
# Security: Parse and report findings if [ -f "trivy-image-report.json" ]; then CRITICAL_COUNT=$(jq '[.Results[].Vulnerabilities[]? | select(.Severity=="CRITICAL")] | length' trivy-image-report.json) HIGH_COUNT=$(jq '[.Results[].Vulnerabilities[]? | select(.Severity=="HIGH")] | length' trivy-image-report.json) MEDIUM_COUNT=$(jq '[.Results[].Vulnerabilities[]? | select(.Severity=="MEDIUM")] | length' trivy-image-report.json)
echo "========================================" echo "Image Scan Results:" echo " Critical: $CRITICAL_COUNT" echo " High: $HIGH_COUNT" echo " Medium: $MEDIUM_COUNT" echo "========================================" fi
# Security: Fail on critical/high vulnerabilities trivy image \ --exit-code 1 \ --severity "${FAIL_ON_SEVERITY}" \ --format table \ "$IMAGE_NAME" || { echo "ERROR: Critical/High vulnerabilities detected in image" exit 1 }
echo "✓ Image scan completed successfully"
artifacts: name: 'trivy-image-scan-$CI_COMMIT_SHORT_SHA' reports: container_scanning: trivy-image-report.json paths: - trivy-image-report.json - trivy-image-report.txt - sbom.json expire_in: 90 days when: always
allow_failure: false
only: - branches - tags
# Security: Scan Kubernetes manifeststrivy_config_scan: stage: scan image: name: aquasec/trivy:0.48.3 entrypoint: ['']
timeout: 15 minutes
extends: .security_template
script: - | set -euo pipefail
# Security: Check if k8s directory exists if [ ! -d "./k8s" ]; then echo "INFO: No Kubernetes manifests found, skipping config scan" exit 0 fi
echo "Scanning Kubernetes configurations..."
# Security: Scan configurations trivy config \ --exit-code 0 \ --severity "${FAIL_ON_SEVERITY},MEDIUM" \ --format json \ --output trivy-config-report.json \ --timeout "${TRIVY_TIMEOUT}" \ ./k8s
# Security: Generate table report trivy config \ --severity "${FAIL_ON_SEVERITY},MEDIUM,LOW" \ --format table \ --output trivy-config-report.txt \ ./k8s
# Security: Fail on high severity misconfigurations trivy config \ --exit-code 1 \ --severity "${FAIL_ON_SEVERITY}" \ --format table \ ./k8s || { echo "WARNING: High severity misconfigurations detected" exit 0 # Don't block on config issues }
echo "✓ Configuration scan completed"
artifacts: name: 'trivy-config-scan-$CI_COMMIT_SHORT_SHA' paths: - trivy-config-report.json - trivy-config-report.txt expire_in: 90 days when: always
allow_failure: true # Config warnings shouldn't block deployment
only: - branches - tags
# Security: Generate consolidated reportgenerate_report: stage: report image: alpine:3.19
dependencies: - trivy_fs_scan - trivy_image_scan - trivy_config_scan
before_script: - apk add --no-cache jq
script: - | set -euo pipefail
echo "Generating consolidated security report..."
cat > security-report.md << EOF # Security Scan Report
**Project:** $CI_PROJECT_NAME **Commit:** $CI_COMMIT_SHORT_SHA **Pipeline:** $CI_PIPELINE_ID **Date:** $(date -u +"%Y-%m-%d %H:%M:%S UTC")
## Scan Results Summary
EOF
# Add filesystem scan results if [ -f "trivy-fs-report.txt" ]; then echo "### Filesystem Scan" >> security-report.md echo '```' >> security-report.md head -n 50 trivy-fs-report.txt >> security-report.md echo '```' >> security-report.md echo "" >> security-report.md fi
# Add image scan results if [ -f "trivy-image-report.txt" ]; then echo "### Container Image Scan" >> security-report.md echo '```' >> security-report.md head -n 50 trivy-image-report.txt >> security-report.md echo '```' >> security-report.md echo "" >> security-report.md fi
echo "✓ Consolidated report generated"
artifacts: name: 'security-report-$CI_COMMIT_SHORT_SHA' paths: - security-report.md expire_in: 90 days
only: - branches - tags
# Security: Deploy only if scans passdeploy: stage: deploy image: alpine:3.19
dependencies: - build - trivy_fs_scan - trivy_image_scan
script: - | set -euo pipefail
echo "Deploying $IMAGE_NAME..."
# Security: Verify all scans passed echo "✓ All security scans passed" echo "✓ Deployment authorized"
# Your deployment commands here
only: - main - tags
when: manual # Require manual approval for productionThis pipeline scans three things: your filesystem for vulnerable dependencies, your Docker image for OS and app vulnerabilities, and your Kubernetes configs for misconfigurations. It generates an SBOM and fails the build if critical or high-severity issues are found. You get comprehensive security coverage without slowing down your pipeline significantly.
Navigating the Shift: Challenges and Best Practices
What are Some Common Challenges When Implementing Shift-Left Security?
Let’s be real: implementing shift-left security isn’t always smooth sailing. You’ll face resistance to change. Development, security, and ops teams might push back against new practices and tools. Getting everyone on board takes time and patience.
Knowledge gaps are another big hurdle. If your teams lack security expertise, making shift-left work is tough. Often, security tools don’t play nicely with development tools, causing visibility issues and friction. Then there’s alert fatigue. Automated security tools can flood developers with alerts and false positives, leading them to ignore important warnings. You’re also trying to balance thorough security testing with the pressure to ship fast.
Other headaches include incomplete testing, failing to maintain the pipeline, underestimating scalability needs, and struggling with configuration management across different environments. Debugging and reporting within CI/CD pipelines can be tricky. Version conflicts might pop up when introducing new security checks.
You might not have fully automated security tools that fit well into CI/CD, or you lack consistent security practices across your infrastructure. There’s the constant worry that security testing will slow down development. Developer adoption can be the biggest challenge, especially if they see security as extra work or if they’re only measured on feature velocity, not code security.
Sometimes security tools don’t match your organization’s specific needs. Scaling shift-left across large, complex organizations is a massive undertaking. Early in development, you can’t always predict runtime issues. And there’s a risk of overloading developers with security responsibilities, expecting them to become security experts on top of everything else they do.
What are the Best Practices for a Successful Shift-Left Implementation in CI/CD?
Making shift-left work requires clear security policies that everyone understands. No ambiguity. Automate security testing (SAST, DAST, and SCA) throughout your CI/CD pipeline to catch issues early without slowing things down. Train developers on secure coding and security tool usage. This isn’t optional. It’s essential for making security a priority.
Foster collaboration between dev, security, and ops teams (that’s the DevSecOps mindset). When everyone works together and shares responsibility, security goals become clearer. Prioritize findings so teams know what to fix first. Not all vulnerabilities are created equal.
Keep your security tools and dependencies updated to stay ahead of new threats. Have clear remediation workflows so vulnerabilities get fixed quickly. Configure tools to reduce false positives so developers can focus on real issues. Make security everyone’s job and create a culture where everyone contributes to building secure software.
Continuously monitor and improve your security practices based on feedback and emerging threats. Start by thinking about security requirements early and add security checks to code reviews. Use tools that automate security and enable collaboration. Track security metrics throughout development and maintain current security documentation.
First, assess your current development process to find where you can effectively shift left. Create a new shift-left security strategy with clear goals and responsibilities. Implement gradually, starting with easy wins. Try to replicate your production environment early in the process.
Encourage early and frequent testing. Use automation for continuous integration and delivery. Carefully evaluate and monitor third-party software. Build a strong security awareness culture among developers. Give them the right tools and knowledge. Always monitor and improve your security policies to keep up with new threats.
Here’s a practical example of a comprehensive security pipeline that combines all three approaches:
# Security: Complete Shift-Left Security Pipeline with All Controlsname: Complete Security Pipeline
# Security: Controlled trigger conditionson: push: branches: [main, develop] paths-ignore: - '**.md' - 'docs/**' pull_request: branches: [main] types: [opened, synchronize, reopened] schedule: # Security: Weekly comprehensive scan - cron: '0 3 * * 0' workflow_dispatch: # Manual security audits
# Security: Minimal required permissions (OIDC best practice)permissions: contents: read security-events: write pull-requests: write deployments: write statuses: write
# Security: Environment variablesenv: # Security: Set global timeout GLOBAL_TIMEOUT: 120 # Security: Enable fail-fast on critical issues FAIL_ON_CRITICAL: 'true'
jobs: # Security: Pre-flight validation validate: name: Validate Pipeline Configuration runs-on: ubuntu-latest timeout-minutes: 5 steps: - name: Validate Environment run: | set -euo pipefail
echo "Validating pipeline environment..."
# Security: Verify required secrets REQUIRED_SECRETS=("SONAR_TOKEN" "SONAR_HOST_URL" "STAGING_URL") for secret in "${REQUIRED_SECRETS[@]}"; do if [ -z "${!secret:-}" ]; then echo "::error::Required secret $secret not configured" exit 1 fi done
echo "✓ Environment validated"
# Security: Static Analysis (SAST) - Fast feedback sast: name: Static Analysis (SAST) runs-on: ubuntu-latest needs: validate timeout-minutes: 30
steps: - name: Checkout Code uses: actions/checkout@v4 with: fetch-depth: 0 persist-credentials: false
- name: Set up JDK uses: actions/setup-java@v4 with: java-version: '17' distribution: 'temurin' cache: 'maven'
# Security: Run SonarQube with strict settings - name: Run SonarQube Scan uses: sonarsource/sonarqube-scan-action@v2 env: SONAR_TOKEN: ${{ secrets.SONAR_TOKEN }} SONAR_HOST_URL: ${{ secrets.SONAR_HOST_URL }} with: args: > -Dsonar.qualitygate.wait=true -Dsonar.qualitygate.timeout=300 -Dsonar.exclusions=**/test/**,**/node_modules/**
# Security: Enforce quality gate - name: Check Quality Gate uses: sonarsource/sonarqube-quality-gate-action@v1 timeout-minutes: 5 env: SONAR_TOKEN: ${{ secrets.SONAR_TOKEN }}
- name: Upload SAST Results if: always() uses: actions/upload-artifact@v4 with: name: sast-results-${{ github.run_number }} path: .scannerwork/ retention-days: 90
# Security: Software Composition Analysis (SCA) - Parallel with SAST sca: name: Dependency Scan (SCA) runs-on: ubuntu-latest needs: validate timeout-minutes: 20
steps: - name: Checkout Code uses: actions/checkout@v4 with: persist-credentials: false
# Security: Comprehensive filesystem scan - name: Run Trivy Filesystem Scan uses: aquasecurity/trivy-action@0.16.1 with: scan-type: 'fs' scan-ref: '.' format: 'sarif' output: 'trivy-fs-results.sarif' severity: 'CRITICAL,HIGH' scanners: 'vuln,secret,config' timeout: '15m'
- name: Upload to GitHub Security uses: github/codeql-action/upload-sarif@v3 if: always() with: sarif_file: 'trivy-fs-results.sarif' category: 'sca-filesystem'
# Security: Fail on critical vulnerabilities - name: Check Vulnerability Threshold uses: aquasecurity/trivy-action@0.16.1 with: scan-type: 'fs' scan-ref: '.' exit-code: '1' severity: 'CRITICAL,HIGH' scanners: 'vuln' ignore-unfixed: true
# Security: Build and scan container build_and_scan: name: Build & Scan Container runs-on: ubuntu-latest needs: [sast, sca] timeout-minutes: 40
steps: - name: Checkout Code uses: actions/checkout@v4 with: persist-credentials: false
# Security: Set up Docker Buildx - name: Set up Docker Buildx uses: docker/setup-buildx-action@v3
# Security: Build with security labels - name: Build Docker Image run: | set -euo pipefail
# Security: Validate Dockerfile if [ ! -f "Dockerfile" ]; then echo "::error::Dockerfile not found" exit 1 fi
# Security: Lint Dockerfile docker run --rm -i hadolint/hadolint < Dockerfile
# Security: Build with metadata docker build \ --no-cache \ --pull \ --label "org.opencontainers.image.created=$(date -u +'%Y-%m-%dT%H:%M:%SZ')" \ --label "org.opencontainers.image.revision=${{ github.sha }}" \ --label "org.opencontainers.image.source=${{ github.server_url }}/${{ github.repository }}" \ -t myapp:${{ github.sha }} \ .
# Security: Scan container image - name: Scan Container Image uses: aquasecurity/trivy-action@0.16.1 with: image-ref: 'myapp:${{ github.sha }}' format: 'sarif' output: 'trivy-image-results.sarif' severity: 'CRITICAL,HIGH,MEDIUM' scanners: 'vuln,secret,config'
- name: Upload Image Scan Results uses: github/codeql-action/upload-sarif@v3 if: always() with: sarif_file: 'trivy-image-results.sarif' category: 'container-image'
# Security: Generate SBOM - name: Generate SBOM run: | set -euo pipefail
docker run --rm \ -v /var/run/docker.sock:/var/run/docker.sock \ aquasec/trivy image \ --format cyclonedx \ --output sbom.json \ myapp:${{ github.sha }}
# Validate SBOM if ! jq empty sbom.json; then echo "::error::Invalid SBOM format" exit 1 fi
- name: Upload SBOM uses: actions/upload-artifact@v4 with: name: sbom-${{ github.run_number }} path: sbom.json retention-days: 90
# Security: Save image for deployment - name: Save Docker Image run: | docker save myapp:${{ github.sha }} | gzip > myapp.tar.gz
- name: Upload Image Artifact uses: actions/upload-artifact@v4 with: name: docker-image-${{ github.run_number }} path: myapp.tar.gz retention-days: 7
# Security: Deploy to staging with health checks deploy_staging: name: Deploy to Staging runs-on: ubuntu-latest needs: build_and_scan timeout-minutes: 20 environment: name: staging url: ${{ secrets.STAGING_URL }}
steps: - name: Download Docker Image uses: actions/download-artifact@v4 with: name: docker-image-${{ github.run_number }}
- name: Load and Deploy Image run: | set -euo pipefail
# Load image docker load < myapp.tar.gz
echo "Deploying to staging..." # Your deployment commands here
# Security: Wait for health check MAX_RETRIES=30 RETRY_COUNT=0
while [ $RETRY_COUNT -lt $MAX_RETRIES ]; do if curl -sSf "${{ secrets.STAGING_URL }}/health"; then echo "✓ Staging deployment healthy" exit 0 fi RETRY_COUNT=$((RETRY_COUNT + 1)) sleep 10 done
echo "::error::Staging deployment health check failed" exit 1
# Security: Dynamic Analysis (DAST) against staging dast: name: Dynamic Analysis (DAST) runs-on: ubuntu-latest needs: deploy_staging timeout-minutes: 45
steps: - name: Checkout Code uses: actions/checkout@v4
# Security: Run OWASP ZAP scan - name: OWASP ZAP Baseline Scan uses: zaproxy/action-baseline@v0.10.0 with: target: ${{ secrets.STAGING_URL }} rules_file_name: '.zap/rules.tsv' cmd_options: '-a -j -T 20' fail_action: true
- name: Upload DAST Report if: always() uses: actions/upload-artifact@v4 with: name: dast-report-${{ github.run_number }} path: | report_html.html report_json.json retention-days: 90
# Security: Security gate before production security_gate: name: Security Gate Review runs-on: ubuntu-latest needs: [sast, sca, build_and_scan, dast] if: always() timeout-minutes: 10
steps: - name: Check All Security Scans run: | set -euo pipefail
echo "Reviewing all security scan results..."
# Security: Verify all jobs passed NEEDS_CONTEXT='${{ toJson(needs) }}' echo "$NEEDS_CONTEXT" | jq -e 'all(.result == "success")' || { echo "::error::One or more security scans failed" exit 1 }
echo "✓ All security gates passed"
# Security: Production deployment (manual approval) deploy_production: name: Deploy to Production runs-on: ubuntu-latest needs: security_gate if: github.ref == 'refs/heads/main' timeout-minutes: 30 environment: name: production url: https://example.com
steps: - name: Download Docker Image uses: actions/download-artifact@v4 with: name: docker-image-${{ github.run_number }}
- name: Load and Deploy Image run: | set -euo pipefail
docker load < myapp.tar.gz
echo "Deploying to production..." # Your production deployment commands here
echo "✓ Production deployment completed"
# Security: Post-deployment verification - name: Verify Production Deployment run: | set -euo pipefail
echo "Verifying production deployment..."
MAX_RETRIES=30 for i in $(seq 1 $MAX_RETRIES); do if curl -sSf "https://example.com/health"; then echo "✓ Production deployment verified" exit 0 fi sleep 10 done
echo "::error::Production verification failed" exit 1
# Security: Notification and cleanup notify: name: Notify Security Team runs-on: ubuntu-latest needs: [deploy_production] if: always()
steps: - name: Send Notification run: | echo "Security pipeline completed" echo "Status: ${{ job.status }}" # Add notification logic (Slack, email, etc.)This pipeline runs SAST and SCA in parallel first (fast feedback), then builds and scans the container, deploys to staging, runs DAST, and only deploys to production if everything passes. It’s a complete shift-left security implementation.
Frequently Asked Questions About Shift-Left Security and CI/CD Integration
Shift-left testing is about moving all types of testing (functional, performance, etc.) earlier in the development cycle to catch bugs sooner and improve software quality. Shift-left security specifically focuses on integrating security practices and testing (SAST, DAST, SCA) from the earliest stages of development. While shift-left testing aims to improve overall quality, shift-left security targets security vulnerabilities specifically. The key difference? Security becomes a first-class concern from day one, not something you bolt on at the end.
As far left as possible. Ideally, security should be part of every stage of your software development lifecycle, starting from initial planning and requirements gathering. This includes defining security requirements upfront, considering security in your design, using secure coding practices during development, and continuously testing throughout the build and release process. The goal is to make security a fundamental part of how you build software, not an afterthought.
Shift-left security boils down to a few core principles: integrate security into every SDLC stage starting with design; automate security testing as much as possible, especially in CI/CD pipelines; foster collaboration and shared responsibility between dev, security, and ops teams (DevSecOps); empower developers with training and tools to write secure code; continuously monitor and get feedback to improve security; and establish clear security policies so developers know what’s expected. The main goal is making security proactive and built-in, not reactive and tacked-on.
Integrating security testing (SAST, DAST, SCA) into CI/CD gives you tons of benefits. You catch vulnerabilities early when they’re cheap and easy to fix. Automation ensures consistent security checks with every code change, reducing human error and preventing security from becoming a bottleneck. Early feedback helps developers learn secure coding practices and improves overall code quality. It speeds up releases by preventing last-minute security fire drills. You get a more secure software supply chain by identifying third-party component vulnerabilities. Automated checks help meet compliance requirements. Continuous monitoring with immediate feedback makes your applications significantly more secure overall.
Integrating security into CI/CD pipelines comes with challenges. It can make your pipeline more complex as you add different security checks. There’s a risk of slowing down release velocity if security testing isn’t optimized. Comprehensive application security means adding various test types, which adds complexity. Sometimes security tools don’t integrate well with each other or your CI/CD platform. Managing the increased volume of alerts and false positives can overwhelm developers. Ensuring consistent security practices across different environments (dev, staging, prod) is hard. You might have gaps from incomplete testing or outdated pipelines. Scaling the pipeline to handle additional security checks without performance degradation requires planning. And you’ll face developer resistance if they perceive it as slowing them down.
It depends on your development velocity, application criticality, and risk tolerance. SAST and SCA should run in your CI process, ideally on every commit or merge to give developers immediate feedback. Daily scans or scans with every significant code change catch issues early. DAST scans need a running application, so they typically run after deployment to staging or test environments. How often you run DAST varies, but common practice is with each staging deployment or on a regular schedule (weekly or nightly). For production apps, occasional DAST scans are good, but be careful not to disrupt availability. SCA should run frequently, ideally with every build or dependency update, because new vulnerabilities are constantly discovered in third-party libraries. Continuous monitoring for new vulnerabilities in your dependencies is a best practice so you can react quickly to emerging threats.
Best practices include establishing clear security policies; automating all three security testing types in your pipeline; providing developers with training and resources on secure coding and tool usage; fostering collaboration between dev, security, and ops teams; prioritizing and remediating findings based on risk; keeping tools and dependencies updated; and having clear remediation workflows. Configure tools to minimize false positives, make security a shared responsibility, and continuously monitor and improve your practices. Start with security requirements early and add security to code reviews.
Overcoming developer resistance requires training and resources so they understand security best practices and know how to use the tools. Integrate security tools seamlessly with their existing workflows (IDEs, version control) to minimize disruption. Configure tools to reduce false positives and provide clear, actionable remediation guidance instead of just dumping alerts on them. Emphasize that security is a shared responsibility and foster collaboration between dev, security, and ops so developers feel supported rather than burdened. Highlight the benefits: less rework, faster releases, better code quality. When developers see the value, they’re more likely to embrace it.
Tackling alert fatigue is crucial for shift-left success. Configure security tools to significantly reduce false positives and low-priority alerts. Prioritize alerts by severity so developers focus on critical issues first, not a massive list. Provide clear, actionable remediation guidance directly in the tools developers use. Consolidate security tools and dashboards for a unified view of findings. Use AI-powered tools that intelligently filter and prioritize based on context and impact. Establish clear SLAs for vulnerability remediation and give developers time and resources to address issues, preventing alert backlog and the feeling of being overwhelmed.
Conclusion
Integrating shift-left security into your development workflow, especially by using SAST, DAST, and SCA in CI/CD pipelines, isn’t optional anymore. In today’s threat landscape, it’s essential. By thinking about security from the start, you’ll save money, ship faster, build more secure applications, and develop security-aware teams.
Yes, implementation has challenges: resistance to change, alert fatigue, tooling complexity. But the best practices we’ve covered (automation, developer training, cross-team collaboration) will get you there. Tools like SonarQube, OWASP ZAP, and Trivy make security a natural part of how you build software, not a painful add-on. The result? Safer, more reliable applications and fewer 3 AM security incidents.
References
- What is Shift Left? Security, Testing & More Explained | CrowdStrike
- Shift Left Security Explained: Key Concepts and Benefits - Check Point Software
- What is Shift Left Security? | Perforce Software
- Shifting Security Left: Benefits & Implementation Tips - StackHawk
- Shift Left Security: A Complete Guide - Codacy | Blog
- The AppSec Guide to Shift-Left Security: How to Integrate Security Earlier in the SDLC - StackHawk
- What is Shift-left Security? | Harness
- Implementing Shift Left Security Effectively - Snyk
- What is Software Composition Analysis (SCA)? | Black Duck
- Source Code Analysis Tools - OWASP Foundation
- Dynamic Application Security Testing (DAST) - OWASP DevSecOps Guideline
- CI/CD Integrations - Trivy
- A Step-by-Step Guide to Integrating SonarQube into Your CI/CD Workflow - Appcircle Blog
- Ultimate Guide to OWASP ZAP: Understanding the Architecture, Implementing CI/CD, and Best Practices - Clovin Security
- Shift Left Security: Principles and Best Practices | Digital.ai