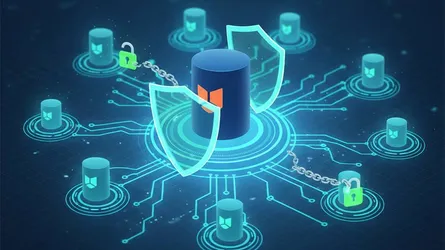
In today’s fast-paced software world, we all rely on container images to package and run our apps. They’re super consistent and efficient, which is great! But this ease also brings new security headaches. We really need to make sure the images running in production are exactly what we expect and haven’t been messed with. That’s where Cosign comes in. It’s a powerful open-source tool that helps us sign and verify our container images, making our software supply chain much safer.
Why Should You Sign Your Container Images?
Container images are like the basic building blocks for today’s apps. They let us package and run software the same way everywhere, without worrying about different setups or dependencies. That consistency is a huge plus, but it also brings some unique security questions.
So, what’s container image signing? It’s basically putting a digital signature on a container image. Think of this signature as a cryptographic seal. It gives you strong proof that the image is real and hasn’t been changed. It confirms the image came from someone you trust and hasn’t been messed with since they signed it. It’s like giving the image a digital fingerprint that you can check later to make sure it’s good. When a developer signs an image with their private key, anyone who gets that image can use the matching public key to confirm it’s the original and where it came from. This is a really important step because it helps stop attacks, like someone trying to sneak bad images into your system. In the end, this digital signature acts as a key checkpoint when you’re putting things out there, making sure only images you’ve checked and trust actually run in your environment.
The big problem container image signing solves goes beyond just general security. It’s about building a solid chain of trust and making sure you can actually verify where your software comes from in today’s complicated supply chains. If you pull an image from a registry without a signature, you really don’t know where it came from or what’s inside, so it’s hard to trust it. This missing proof of origin is a big risk, especially since modern container images often have many layers, with different teams or even outside sources adding to them. For real security, you need to trust every single layer of a container image. Signing gives you that cryptographic connection to check every step of an image’s path from where it started to where it finally runs. This makes the whole process clear and safe. So, image signing isn’t just a nice-to-have security feature; it’s a basic must-have for keeping your software supply chain honest and secure.
Why is Cosign the best tool for this?
Cosign is an open-source tool you run from your command line, and it’s a big part of the larger Sigstore project. Sigstore itself is a non-profit public service, and its main goal is to make software signing easier and safer for everyone.
Cosign’s main idea is to make signatures “invisible to infrastructure.” What that means is the tool tries to make the whole signing and checking process super simple, hiding most of the tricky parts you usually deal with when it comes to digital signatures. Instead of needing separate, complicated systems to keep signatures, Cosign puts them right next to your container image in the Open Container Initiative (OCI) registry. This built-in way of doing things really cuts down on the work you have to do.
Since Cosign is a core part of the Sigstore world, it gets to use Sigstore’s free Certificate Authority, Fulcio, and its public record book, Rekor. This combo is really powerful because it solves one of the toughest parts of signing software: how to safely give out and manage your signing keys. In the past, putting strong security features like digital signatures in place was hard. It often needed a lot of crypto knowledge and a ton of effort. But by making key management simpler and putting signature storage right into your current container registries, Cosign makes it much easier for developers and DevOps teams to get started. This focus on making things easy to use means you can fit these important security steps right into your existing development and deployment routines. That’s why it’s a popular and practical choice for making your container security better. This way of thinking is a big step toward security tools that developers actually like to use, which is key for getting security involved earlier in the development process.
Getting Started: How Do I Install Cosign?
Before you can sign and verify container images, you’ll need to get Cosign installed on your computer. It’s built to work with lots of different systems, so you’ve got a few ways to install it, and it plays nicely with common CI/CD setups.
How do I install Cosign on different operating systems?
If you’ve got Go (version 1.20 or newer) installed, the easiest way to get the latest Cosign directly from its source is to run this command:
go install github.com/sigstore/cosign/v2/cmd/cosign@latestOnce that’s done, you’ll find the Cosign program in your Go binary path, usually $GOPATH/bin/cosign or $GOBIN/cosign.
Or, you can just download ready-to-use programs for Linux, macOS, and Windows directly from the official Cosign releases page on GitHub. For instance, if you’re on a Linux AMD64 system, you can use these commands:
curl -O -L "https://github.com/sigstore/cosign/releases/latest/download/cosign-linux-amd64"sudo mv cosign-linux-amd64 /usr/local/bin/cosignsudo chmod +x /usr/local/bin/cosignIf you like using package managers, installing Cosign is a breeze:
Homebrew (macOS) / Linuxbrew (Linux)
Homebrew is the most popular package manager for macOS and also works on Linux. It maintains up-to-date packages and handles dependencies automatically. This is the recommended method for developers working on macOS or Linux with Homebrew already installed.
brew install cosignAfter installation, Homebrew places the cosign binary in your PATH automatically, typically in /usr/local/bin or /opt/homebrew/bin.
Debian / Ubuntu
For Debian-based distributions like Debian, Ubuntu, Linux Mint, and Pop!_OS, you can download and install the .deb package directly from the official Cosign releases. This method works for both x86_64 and ARM64 architectures.
curl -LO https://github.com/sigstore/cosign/releases/latest/download/cosign_amd64.debsudo dpkg -i cosign_amd64.debFor ARM64 systems (like Raspberry Pi):
curl -LO https://github.com/sigstore/cosign/releases/latest/download/cosign_arm64.debsudo dpkg -i cosign_arm64.debThe .deb package installs Cosign to /usr/bin/cosign and is managed by your system’s package manager, making updates and removal straightforward.
Red Hat Enterprise Linux / CentOS
For RHEL, CentOS, and compatible distributions, Cosign provides .rpm packages. These work with both yum and dnf package managers and are available for x86_64 and ARM64 architectures.
curl -LO https://github.com/sigstore/cosign/releases/latest/download/cosign-amd64.rpmsudo rpm -ivh cosign-amd64.rpmFor ARM64 systems:
curl -LO https://github.com/sigstore/cosign/releases/latest/download/cosign-arm64.rpmsudo rpm -ivh cosign-arm64.rpmThe RPM package integrates with your system’s package management, allowing you to remove it later with sudo rpm -e cosign if needed.
Fedora
Fedora users can install Cosign using the .rpm package with dnf, Fedora’s modern package manager. The process is similar to RHEL/CentOS but optimized for Fedora’s faster release cycle.
curl -LO https://github.com/sigstore/cosign/releases/latest/download/cosign-amd64.rpmsudo dnf install cosign-amd64.rpmFor ARM64 systems:
curl -LO https://github.com/sigstore/cosign/releases/latest/download/cosign-arm64.rpmsudo dnf install cosign-arm64.rpmUsing dnf install instead of rpm -ivh allows dnf to automatically handle any dependencies if they’re needed in future versions.
Arch Linux
Arch Linux users can install Cosign directly from the official repositories using pacman. The Arch package is maintained by the community and stays current with upstream releases.
sudo pacman -S cosignThis installs Cosign system-wide and makes it immediately available in your shell. You can also check for updates using sudo pacman -Syu.
Alpine Linux
Alpine Linux is commonly used in container images due to its minimal size. Cosign is available in Alpine’s package repositories, making it perfect for lightweight container-based signing workflows.
apk add cosignThis is particularly useful when building CI/CD pipeline containers where you need Cosign available but want to keep the image size small. Alpine’s apk package manager downloads and installs efficiently.
Nix / NixOS
Nix is a powerful, declarative package manager that works on Linux and macOS. It provides reproducible builds and allows you to install packages without affecting your system state. Perfect for developers who need isolated, reproducible environments.
nix-env -iA nixpkgs.cosignNix packages are fully isolated and can coexist with other versions. You can also add Cosign to your NixOS system configuration or development shells declaratively.
Windows
Windows users can install Cosign using Scoop, a command-line installer, or by downloading the binary directly. Scoop is recommended as it handles PATH configuration automatically.
Chocolatey:
choco install cosignUsing Scoop:
scoop install cosignManual Installation:
Download the Windows binary and add it to your PATH:
curl -LO https://github.com/sigstore/cosign/releases/latest/download/cosign-windows-amd64.exeMove-Item .\cosign-windows-amd64.exe C:\Windows\System32\cosign.exeAfter installation, open a new PowerShell or Command Prompt window and verify with cosign version.
Cosign is also built for automated tasks, and it works directly with popular CI/CD platforms:
- GitHub Actions: The
sigstore/cosign-installer@mainGitHub Action makes installing Cosign in a workflow simple. You can even pick a specific Cosign release version if you need to. - GitLab CI: In GitLab CI jobs, you can install Cosign in the
before_scriptsection, often usingapk add --update cosignfor Alpine-based runners.
For container setups, you can even find signed release images of Cosign itself at ghcr.io/sigstore/cosign/cosign.
How can I quickly check if Cosign is installed?
To make sure it’s installed correctly, just type cosign version in your terminal. You should see something like this, telling you Cosign is good to go:
$ cosign versioncosign: A tool for Container Signing, Verification and Storage in an OCI registry.GitVersion: 1.13.1Here’s something important, but often missed, about supply chain security: you need to trust the tools you’re using to secure everything else. The Sigstore project takes this seriously. They sign Cosign’s own programs using both keyless signing and an artifact key. Before you even start using Cosign, it’s a good idea to check its authenticity with The Update Framework (TUF). This is a great example of a “security-in-depth” approach, meaning we’re applying the same trust principles to the tools that help us verify things. It shows you need to be careful at every step of the software supply chain, even with the security tools themselves. This dedication to making sure its own distribution is safe sets a high bar and reinforces the idea that supply chain security is a problem that keeps on giving, needing attention at every level, from your app’s code to the tools you use to build and deploy it.
Signing Your Images: How Do I Secure My Containers with Cosign?
Now that Cosign’s installed, it’s time to actually secure your container images by signing them. Cosign gives you a few different ways to sign, so you can pick what works best for your security needs and how you operate.
How do I use key-based signing?
This is a more traditional way of doing things. You use a private/public key pair. Your private key stays secret and you use it to create the digital signature. Then, you share the public key so others can check that signature.
To make these key pairs, Cosign has a simple command:
cosign generate-key-pairThis command will ask you to set a password to protect your private key. Then, it creates two files: cosign.key (that’s your private key) and cosign.pub (that’s the public one). It’s super important to guard that private key carefully. You should keep its password in a secure manager, like HashiCorp Vault or AWS KMS.
Once you’ve got your key pair, you can sign an image using your private key:
cosign sign --key cosign.key your-registry.com/your-image:latestCosign will ask for the password you set when you made the keys. The signature it creates then goes right into your OCI registry, next to the image. It usually shows up as a new tag that includes the image’s digest (like your-registry.com/your-image@sha256:abc...def.sig).
While this works, key-based signing brings some real challenges for operations and security. The biggest worry is keeping that private key safe: how do you store it, get it to your signing systems (like CI/CD agents), and change it regularly without someone getting their hands on it? If a private key gets stolen, an attacker could sign bad images that look legitimate, totally breaking your trust system. This difficulty with key management is a big reason why we’re seeing more advanced, “keyless” signing methods. The actual signing part is easy, but keeping long-lived private keys secure is a huge job and a major way attackers can get in with traditional security. This really shows why we need ways to make key management easier or even get rid of it entirely, which is exactly what keyless signing tries to do.
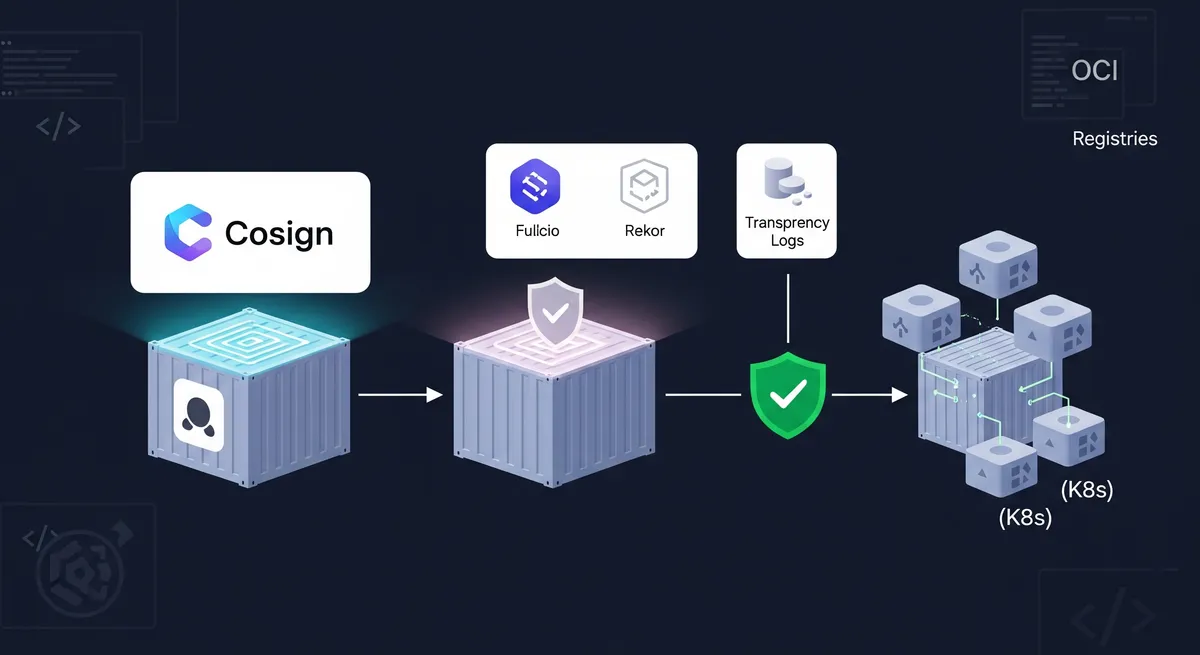
What’s keyless signing and how does it work with Sigstore, OIDC, Fulcio, and Rekor?
Keyless signing is Cosign’s standout feature, and it’s what we usually suggest for most situations. This game-changing method means you don’t have to deal with long-lasting private keys anymore. Instead, it uses your existing identities, like your Google, GitHub, or Microsoft accounts, to create temporary signing keys that only stick around for a short time.
The whole process, often called the Sigstore Flow, works like this:
- Temporary Key Creation: When you run
cosign signin keyless mode, Cosign first makes a temporary public/private key pair in your computer’s memory. This key pair is only around for that one signing job. - Identity Check (Fulcio): Cosign then asks you to log in with an OpenID Connect (OIDC) provider, like Google, GitHub, Microsoft, or GitLab. It sends a Certificate Signing Request (CSR) and your OIDC identity token to Fulcio, which is Sigstore’s free, public Certificate Authority. Fulcio checks your identity and then gives you a short-lived X.509 certificate, usually good for only about 10 minutes. This certificate cryptographically links that temporary public key to your confirmed OIDC identity.
- Signing & Key Deletion: Cosign goes ahead and signs the container image using that temporary private key. Here’s the important part: right after it’s done signing, that private key is completely wiped out and never saved anywhere. This dramatically lowers the chance of someone stealing your key.
- Public Record (Rekor): Cosign then writes down the signature, the short-lived certificate, and other important details, like the image’s digest, in Rekor. Rekor is Sigstore’s public, tamper-proof record book. This record gives you a permanent, auditable history of every signing event, so you can keep an eye out for anything suspicious.
- Upload: Finally, the signature, the certificate, and proof that it’s in Rekor all get uploaded to the OCI registry, right next to your container image.
The command to sign using this method is pretty simple:
cosign sign your-registry.com/your-image:latestIn automated setups, like a CI/CD pipeline, Cosign can often figure out the OIDC issuer (like GitHub or GitLab) on its own and handle logging in without you needing to do anything.15 For example, in GitLab CI, you’d set the SIGSTORE_ID_TOKEN environment variable with the aud: sigstore claim.
Keyless signing directly solves that “key management problem” you get with older signing methods. By using temporary keys and connecting signatures to your existing OIDC identities, it really takes the pressure off developers who would otherwise have to keep sensitive private keys safe and sound. This way, there’s less for attackers to target, and it makes things much easier to run. The public record book (Rekor) makes it even stronger by giving you a permanent, auditable history of every signing event. That’s super important for spotting any unauthorized use of an identity, even if someone did manage to get in. This whole idea is a big step forward for software supply chain security. It moves us toward a more automated, identity-focused, and open way of doing things that deals with the real-world issues of traditional Public Key Infrastructure (PKI).
How can I use Key Management Services (KMS) for better security?
If your organization already has key management systems in place, strict compliance rules, or just prefers to keep keys in one central spot, Cosign works really well with different Key Management Service (KMS) providers. This means you can use keys backed by hardware or managed in the cloud for your signing tasks.
Cosign supports big cloud KMS providers like AWS KMS, Google Cloud KMS, and Azure Key Vault, plus Hashicorp Vault and even Kubernetes Secrets. When you’re using KMS, Cosign points to the key using a go-cloud style URI. Here are some examples:
- AWS KMS:
awskms://$ENDPOINT/$KEYID - GCP KMS:
gcpkms://projects/$PROJECT/locations/$LOCATION/keyRings/$KEYRING/cryptoKeys/$KEY/versions/$KEY_VERSION - Azure Key Vault:
azurekms:///[KEY] - Hashicorp Vault:
hashivault://$keyname - Kubernetes Secret:
k8s:///[NAME]
You can even make keys right inside your KMS provider using Cosign:
cosign generate-key-pair --kms <some provider>://<some key>To sign an image with a key managed by KMS, you just pass the KMS URI to the --key flag:
cosign sign --key <some provider>://<some key> $IMAGE_DIGESTIt’s important to remember that the user or service account doing these things will need the right IAM roles and permissions within your specific KMS provider (for example, Key Vault Crypto Officer to create keys, and Key Vault Crypto User to sign in Azure Key Vault).
KMS integration is super important for big companies to use Cosign. It lets them use their current security tools and meet tough compliance rules, like FIPS, SOC 2, or ISO 27001, which often say you have to use Hardware Security Modules (HSMs) or cloud-managed keys. While keyless signing is a great choice for many situations, KMS gives you the flexibility you need for highly regulated environments. It makes sure your signing keys are managed with the best security and audit trails possible. This feature connects modern security practices with the demands of running things at an enterprise level.
Why should I always sign image digests, not mutable tags?
This is a basic rule for container image security. Tags (like :latest or :v1.0) are handy, but they can change. Someone could overwrite them to point to a totally different image without you knowing. If you sign a tag, and then that tag gets updated to point to a bad image, the original signature for the old stuff doesn’t mean anything for the new stuff anymore.
Digests, on the other hand, never change. A digest (like sha256:abcdef...) is a cryptographic hash that gives you a unique ID for the exact content of an image. It’s like a permanent, unchangeable fingerprint.
So, the best advice is to always sign the image using its digest. This makes sure the signature is cryptographically tied to the exact, unchanging content of the image, creating a strong, verifiable link to where it came from. A good CI/CD pipeline should grab the image digest right after building and pushing the image, and then sign that specific digest.
Signing image digests instead of those changeable tags is a really important practice. It directly tackles the main problem of making sure things can’t be changed and you can trace them precisely in your software supply chain. Tags can change, and that’s a known weak spot. An attacker could swap out a trusted image for a bad one using the same tag, getting past your basic trust checks. But by signing the digest, you create a link to the exact content that can’t be faked. This guarantees that the image you check is precisely what you wanted and stops supply chain attacks that try to trick you with changing tags. This just shows how important it is to understand how container registries really work and to make smart security choices that put immutability first, even if it means a little less convenience.
Here is a summary of the key management options available with Cosign:
| Method | Description | Pros | Cons | Example Command |
|---|---|---|---|---|
| Key-based | Traditional private/public key pair. Private key is stored locally. | Full control over keys. | Complex key management (storage, distribution, rotation); high risk if private key is compromised. | cosign sign --key cosign.key my-image@sha256:digest |
| Keyless (Sigstore) | Uses ephemeral keys and OIDC identities (Google, GitHub, Microsoft, GitLab) with Fulcio CA and Rekor transparency log. | No long-lived keys to manage; uses existing identities; public auditability. | Relies on Sigstore public infrastructure (or self-hosted); needs an OIDC provider. | cosign sign my-image@sha256:digest |
| KMS (Key Management Service) | Works with cloud KMS (AWS, GCP, Azure), Hashicorp Vault, Kubernetes Secrets. | Centralized, secure key management (often HSM-backed); meets compliance needs. | Adds cloud provider dependency; needs specific IAM permissions. | cosign sign --key gcpkms://... my-image@sha256:digest |
Verifying Trust: How Do I Validate Signed Container Images?
Signing images is just one piece of the security puzzle. The real power of image signing comes from being able to check those signatures. This vital step makes sure that any image you put out there is truly authentic and hasn’t been messed with.
How do I verify images with public keys?
The most common way to check a signed image is by using the public key that goes with the private key used for signing. The basic command for this is pretty simple:
cosign verify [--key <key path>|<key url>|<kms uri>] <image uri>If the person who signed it gave you their cosign.pub file, you can check the image using a public key right there on your computer:
cosign verify --key cosign.pub your-registry.com/your-image@sha256:digestIf you have a signed image stored locally, like in an air-gapped setup, you can check it without an internet connection:
cosign verify --key cosign.pub --local-image PATH/to/your/imageIf the image was signed with a key from a KMS, you can check it by just pointing to the KMS URI, assuming you have the right permissions to get to the public key:
cosign verify --key <some provider>://<some key> your-registry.com/your-image@sha256:digestOr, you can pull the public key out of the KMS and use it as a local file to check.22 Cosign even lets multiple people sign one image. When you run cosign verify, it checks all the signatures attached, making sure everyone who needed to approve the image did.
What’s keyless verification and how does it work?
Keyless verification is a really cool part of Cosign. It changes how we think about trust, moving from fixed keys to identities you can actually verify. This method works especially well in automated setups.
For identity-based checks, instead of giving it a public key file, you tell it the signer’s expected identity and their OIDC issuer:
cosign verify your-registry.com/your-image@sha256:digest \ --certificate-identity=name@example.com \ --certificate-oidc-issuer=https://accounts.example.comCosign works with popular OIDC providers, including:
- Google:
https://accounts.google.com - Microsoft:
https://login.microsoftonline.com - GitHub:
https://github.com/login/oauth - GitLab:
https://gitlab.com
Behind the scenes, when you start a keyless verification, Cosign does a few important things: it gets the signature and certificate from the OCI registry, cryptographically checks the signature, compares the signing event with Rekor (that public record book) to confirm it’s there, and then finally makes sure the identity in the certificate matches what you told it in the command.
For things that aren’t container images (like plain files, or “blobs”), the signature and certificate can be put together into one file (cosign.bundle) when you sign it. You can then use this bundle to check it:
cosign verify-blob my-file.txt --bundle cosign.bundle \ --certificate-identity=name@example.com \ --certificate-oidc-issuer=https://accounts.example.comFor container images, this bundle info is automatically included by default when you use keyless signing.
Keyless verification is a big step forward in how we build trust in software. It moves past the complicated and error-prone job of safely giving out and managing fixed public keys. Instead, it uses existing, strong OIDC identity providers. This makes checking things easier for users because they can rely on a well-known identity provider instead of a specific key file. Adding the Rekor public record book makes it even stronger by giving you a permanent, publicly auditable record that the signing event happened. This adds another layer of proof and trust. This change makes verification easier to scale and more user-friendly, taking some of the load off users and making security more available across big software systems by using identity setups that are already there.
How do attestations add more trust with SBOMs and vulnerability scans?
Beyond just checking if an image is intact, Cosign lets you verify “attestations.” These are signed bits of information about an artifact, giving you detailed, verifiable facts about what’s inside, how it was built, and its security status. They usually follow the in-toto format, which is a well-known standard for keeping software supply chains open and clear.
Common types of attestations you’ll see are:
- Software Bill of Materials (SBOMs): This is a full, detailed list of all open-source and commercial parts, libraries, and dependencies packed into an image.
- Vulnerability Scans: These are records showing the results of security checks run on the image.
- Build Provenance: Specifics about how, when, and by whom the image was built.
You can check attestations using the cosign verify-attestation command:
cosign verify-attestation your-registry.com/your-image@sha256:digestYou can also check against a public key or by telling it the attestation type (for example, --type https://spdx.dev/Document for SPDX SBOMs).
If you want to look at the raw attestation data, you can download it:
cosign download attestation --predicate-type=https://spdx.dev/Document your-registry.com/your-image@sha256:digestHere’s a practical example: making and checking an SBOM attestation with Trivy:
-
Make an SBOM: Use a tool like Trivy to create an SBOM for your image in a format it understands (like SPDX or CycloneDX):
Create SBOM with Trivy trivy image --format spdx -o sbom.spdx your-registry.com/your-image:latest -
Create Attestation: Sign the SBOM and attach it to the image as an attestation. If you’re using key-based signing:
Sign SBOM Attestation with Key cosign attest --key cosign.key --type spdx --predicate sbom.spdx your-registry.com/your-image@sha256:digestFor keyless signing, use
COSIGN_EXPERIMENTAL=1because this feature is still being worked on:Sign SBOM Attestation with Keyless Signing COSIGN_EXPERIMENTAL=1 cosign attest --type spdx --predicate sbom.spdx your-registry.com/your-image@sha256:digest -
Check Attestation:
Verify SBOM Attestation cosign verify-attestation --key cosign.pub --type spdx your-registry.com/your-image@sha256:digest
Attestations, especially SBOMs, take container security way beyond just checking if something’s been tampered with. They give you detailed, verifiable insights into what’s inside your software and where it came from. This is super important for “shift-left security,” which means finding and fixing security holes much earlier in the development process. Plus, with more and more rules and government orders, like the US Executive Order on Cybersecurity, SBOMs and verifiable attestations are becoming essential for showing you’re compliant and doing your homework in the software supply chain. They help users make truly informed choices about the software they run, giving them info not just about whether an image was signed, but also about what’s actually in it. Attestations are a key part of a solid software supply chain security plan, helping organizations understand, handle, and talk about the risks that come with their software dependencies more effectively.
Here is a summary of key attestation types supported by Cosign:
| Attestation Type | Predicate Type URL | Description | Example Use Case |
|---|---|---|---|
| Software Bill of Materials (SBOM) | https://spdx.dev/Document or https://cyclonedx.org/schema | A full list of all software components, libraries, and dependencies. | Good for vulnerability management, license compliance. |
| Vulnerability Scan Record | https://cosign.sigstore.dev/attestation/vuln/v1 (or custom) | A record of known vulnerabilities found in the image. | Good for making sure images meet security standards before deployment. |
| Build Provenance (in-toto) | https://in-toto.io/Statement/v0.1 (or specific build system predicate) | Details about how the image was built, including source code, build environment, and steps. | Good for checking the integrity of the build process itself. |
Automating Security: How Does Cosign Fit into My CI/CD Pipeline?
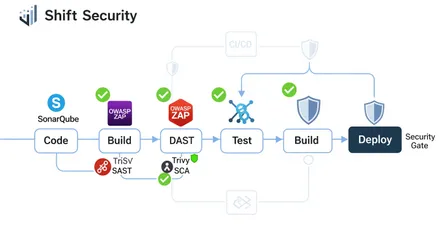
Putting Cosign into your Continuous Integration/Continuous Delivery (CI/CD) pipeline is where container image signing really gets automated and can grow with you. This “shift-left” idea means container security becomes a natural part of your development process right from the start.
How do I integrate Cosign with GitHub Actions for easy signing?
GitHub Actions is a popular platform for automating tasks, especially for projects on GitHub. Cosign works perfectly with it.
Getting Cosign installed in a GitHub Actions workflow is easy thanks to the sigstore/cosign-installer@main GitHub Action. You can just add it as a step in your workflow, and you can even pick a specific Cosign version if you need to.
GitHub Actions is a great fit for keyless signing. Your workflow can automatically create an OIDC token that Cosign uses to prove its identity to Sigstore’s Fulcio CA. For this to happen, your workflow needs to have id-token: write permissions set up.
Here is an example GitHub Actions workflow snippet showing the process:
name: Build and Sign Container Image
on: push: branches: - main
jobs: build-and-sign: runs-on: ubuntu-latest permissions: contents: read # To checkout code packages: write # To push images to GitHub Packages id-token: write # Required for keyless signing with GitHub OIDC Token steps: - uses: actions/checkout@v4 - name: Install Cosign uses: sigstore/cosign-installer@v3.8.1 # Or @main for latest - name: Set up Docker Buildx uses: docker/setup-buildx-action@v3 - name: Login to GitHub Container Registry uses: docker/login-action@v3 with: registry: ghcr.io username: ${{ github.actor }} password: ${{ secrets.GITHUB_TOKEN }} - name: Build and push image id: push uses: docker/build-push-action@v5 with: context:. push: true tags: ghcr.io/${{ github.repository }}:latest - name: Sign the container image run: | cosign sign --yes ghcr.io/${{ github.repository }}@${{ steps.push.outputs.digest }} \ --annotations "com.github.workflow=${{ github.workflow }}" \ --annotations "com.github.run_id=${{ github.run_id }}" - name: Verify the signed image run: | cosign verify ghcr.io/${{ github.repository }}@${{ steps.push.outputs.digest }} \ --certificate-identity "https://github.com/${{ github.repository }}/.github/workflows/main.yml@refs/heads/main" \ --certificate-oidc-issuer "https://token.actions.githubusercontent.com"How do I automate image signing in GitLab CI?
GitLab CI/CD is really tied into GitLab repositories, so it’s another fantastic place to automate image signing.
You can also use GitLab ID tokens for keyless signing with Cosign. You’ll need to set up the id_tokens section in your .gitlab-ci.yml file to have the aud claim as sigstore. Cosign will then find and use this token on its own.
Here is an example GitLab CI/CD .gitlab-ci.yml snippet:
stages: - build - sign - verify
variables: IMAGE_TAG: $CI_COMMIT_SHORT_SHA IMAGE_URI: $CI_REGISTRY_IMAGE:$IMAGE_TAG COSIGN_YES: 'true' # Auto-confirm Cosign actions
build_and_push: stage: build image: docker:latest services: - docker:dind # Enable Docker-in-Docker script: - apk add --no-cache cosign jq # Install Cosign and jq - docker login -u "gitlab-ci-token" -p "$CI_JOB_TOKEN" "$CI_REGISTRY" - docker build -t "$IMAGE_URI". - docker push "$IMAGE_URI" - IMAGE_DIGEST=$(docker inspect --format='{{index.RepoDigests 0}}' "$IMAGE_URI") - echo "IMAGE_DIGEST=$IMAGE_DIGEST" >> build.env artifacts: reports: dotenv: build.env
sign_image: stage: sign image: docker:latest services: - docker:dind needs: - job: build_and_push artifacts: true id_tokens: SIGSTORE_ID_TOKEN: aud: sigstore # Provide OIDC token for keyless signing script: - apk add --no-cache cosign jq - docker login -u "gitlab-ci-token" -p "$CI_JOB_TOKEN" "$CI_REGISTRY" - cosign sign "$IMAGE_DIGEST" \ --annotations "com.gitlab.ci.user.name=$GITLAB_USER_NAME" \ --annotations "com.gitlab.ci.pipeline.id=$CI_PIPELINE_ID" \ --annotations "com.gitlab.ci.job.id=$CI_JOB_ID" \ --annotations "tag=$IMAGE_TAG"
verify_image: stage: verify image: docker:latest services: - docker:dind needs: - job: sign_image artifacts: true script: - apk add --no-cache cosign jq - docker login -u "gitlab-ci-token" -p "$CI_JOB_TOKEN" "$CI_REGISTRY" - cosign verify "$IMAGE_URI" \ --annotations "tag=$IMAGE_TAG" \ --certificate-identity "$CI_PROJECT_URL//.gitlab-ci.yml@refs/heads/$CI_COMMIT_REF_NAME" \ --certificate-oidc-issuer "$CI_SERVER_URL" | jq.What about other CI/CD platforms like Jenkins?
Jenkins, known for being super flexible and having tons of plugins, is still a popular choice, especially for complicated workflows and working with older systems.
For Jenkins, you’ll need to install the Cosign program on your Jenkins agent(s). This could mean adding commands to your Jenkinsfile or setting up your agents with Cosign already there. If you’re doing key-based signing, Jenkins can safely keep private keys and passwords as credentials. You then just refer to these secrets in your pipeline script.
While Jenkins doesn’t have the same built-in OIDC support for keyless signing that GitHub or GitLab do, you can still make it work with some more advanced setup. This usually means configuring Jenkins to get OIDC tokens from a supported provider and then giving those tokens to Cosign using the SIGSTORE_ID_TOKEN environment variable. You might need some custom scripts or special plugins for this.
Automating image signing inside your CI/CD pipeline turns it into a really important checkpoint for software supply chain security. By putting signing in early in your development process, organizations make sure security isn’t just something you think about later. It’s a core part of building and deploying your software. This automation cuts down on human mistakes, speeds up how fast you can release things, and constantly assures you that every container image you deploy has a verifiable origin and is intact. Your CI/CD pipeline becomes the guardian, automatically applying and checking signatures. That’s crucial for maintaining a strong and trustworthy software supply chain at scale.
Advanced Use Cases: Beyond Basic Signing
While just signing and checking images is super important, Cosign can do even more. It lets you set up more advanced security, especially in Kubernetes environments.
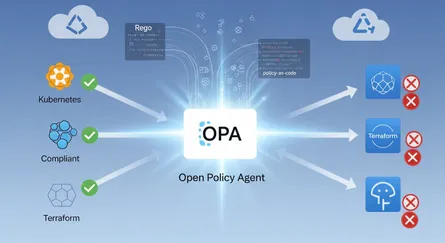
How do I enforce policies in Kubernetes to ensure only trusted images deploy?
Once your container images are signed, the next smart move is to set up rules that make sure only those signed, trusted images get deployed into your Kubernetes cluster. You do this with admission controllers, which are like “gatekeepers” that catch requests to the Kubernetes API server before anything actually gets saved.
Popular tools for setting up rules in Kubernetes are Kyverno and Open Policy Agent (OPA) with Gatekeeper. You can set these up to check Cosign signatures before letting new container images into your cluster.
-
Kyverno: Kyverno is a policy engine built specifically for Kubernetes. It lets you define policies using YAML, which feels natural if you’re already working with Kubernetes. It can enforce rules that say all container images deployed to a cluster must be signed. A Kyverno
ClusterPolicycan list the image references to check and include the Cosign public key to validate the signature. If an image doesn’t have a valid signature, Kyverno can stop its deployment. Here is a simplified Kyverno policy example to enforce Cosign signature verification:Kyverno ClusterPolicy Example apiVersion: kyverno.io/v1kind: ClusterPolicymetadata:name: check-signed-imagesspec:validationFailureAction: Enforce # Blocks deployment if policy failsbackground: falserules:- name: require-image-signaturematch:any:- resources:kinds:- PodverifyImages:- imageReferences:- 'your-registry.com/your-image:*' # Apply to specific imagesattestors:- keys:publicKeys: |------BEGIN PUBLIC KEY-----MFkwEwYHKoZIzj0CAQYIKoZIzj0DAQcDQgAE... # Your Cosign public key (cosign.pub content)-----END PUBLIC KEY-----If you apply this
ClusterPolicywithkubectl apply -f policy.yaml, it’ll make sure any Pod trying to use an unsigned image (or one signed with a different key) gets blocked. -
OPA/Gatekeeper: OPA Gatekeeper uses Rego, a special language for policies, to define the rules that admission controllers enforce. It can work with Cosign using its ExternalData feature to figure out if images are valid by checking their signatures.
Admission controllers like Kyverno and OPA/Gatekeeper are a really important last line of defense in your software supply chain. They make sure that even if an unsigned or messed-with image somehow gets into
References
- Container Image Signing: A Practical Guide - Aqua Security, accessed on June 6, 2025, https://www.aquasec.com/cloud-native-academy/supply-chain-security/container-image-signing/
- Sign Container Images with Notation and Azure Key Vault - Learn Microsoft, accessed on June 6, 2025, https://learn.microsoft.com/en-us/azure/container-registry/container-registry-tutorial-sign-build-push
- Use Sigstore for keyless signing and verification - GitLab Docs, accessed on June 6, 2025, https://docs.gitlab.com/ci/yaml/signing_examples/
- Supply Chain Security: Sigstore and Cosign (Part II) - GitGuardian Blog, accessed on June 6, 2025, https://blog.gitguardian.com/supply-chain-security-sigstore-and-cosign-part-ii/
- Frequently asked questions - Sigstore, accessed on June 6, 2025, https://docs.sigstore.dev/about/faq/
- Installation - Sigstore, accessed on June 6, 2025, https://docs.sigstore.dev/cosign/system_config/installation/
- Overview - Sigstore, accessed on June 6, 2025, https://docs.sigstore.dev/cosign/signing/overview/
- Signing Blobs - Sigstore, accessed on June 6, 2025, https://docs.sigstore.dev/cosign/signing/signing_with_blobs/
- SBOM attestation - Trivy, accessed on June 6, 2025, http://trivy.dev/v0.33/docs/attestation/sbom/
- In-Toto Attestations - Sigstore, accessed on June 6, 2025, https://docs.sigstore.dev/cosign/verifying/attestation/
- Specifications - Sigstore, accessed on June 6, 2025, https://docs.sigstore.dev/cosign/system_config/specifications/
- Verify Images | Kyverno, accessed on June 6, 2025, https://release-1-9-0.kyverno.io/docs/writing-policies/verify-images/
- Image Signing and Attestation with Trivy, Kyverno, and Cosign - Anais Urlichs, accessed on June 6, 2025, https://anaisurl.com/trivy-cosign-kyverno/